


The Henry Guarantee

We are confident that you’ll enjoy and be proud to own any of our Henry firearms, well known for their reliability, accuracy, handsome looks and smooth action.
Our goal has and always will be to manufacture a line of classic, well-crafted firearms that every enthusiast would find readily affordable.
We take great pride in manufacturing our shotguns in the United States, hence our corporate motto “Made in America, or Not Made at All”.
Thank you very much for spending your hard earned money to purchase a Henry. I certainly appreciate it and welcome you to the Henry family. As an owner of a Henry, you are backed by our lifetime warranty and my personal guarantee for 100% satisfaction. I will do what it takes to make certain you are happy with your purchase.
Sincerely,
Anthony Imperato
Henry Repeating Arms
Telephone: 201.858.4400
Simple Limited Lifetime Warranty
General Gun Safety Handling
Specifications
Ammunition Selection
Range and Shooting Cautions
Operating Instructions
1/4 Cock Safety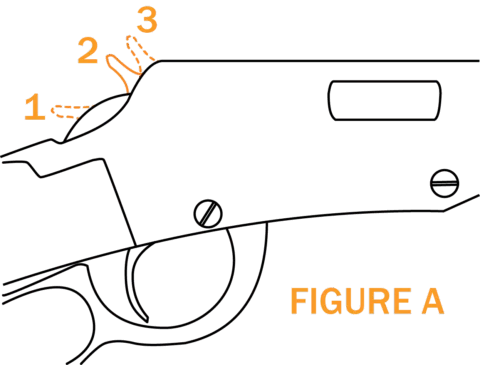 HOW TO PLACE THE HAMMER IN THE SAFETY POSITION
There are two ways to set the hammer into the Safety position. Always keep the gun pointed in a safe direction. With the hammer in the fired (down) position (#3 Figure A), cock the hammer back slightly, about a 1/16th to a 1/8th of an inch, until you feel and hear the hammer click into the Safety position (#2 Figure A). The hammer and trigger will now be locked into the Safety position and, if you pull the trigger to fire, the trigger should not move and the hammer should not fall.
The second way to set the safety is to cock the hammer all the way by pulling the forearm back, thus opening the action and pushing the hammer back into the fully-cocked position (#1 Figure A). Then push the forearm fully forward closing the action. Warning: This causes a round to be loaded into the chamber and the gun is now ready to fire! Now firmly hold the hammer back with your thumb. While holding the hammer, apply just enough pressure on the trigger to release the hammer from the full cock position. Remove your finger from the trigger very quickly and slowly lower the hammer into the Safety position. The hammer will now be locked into the Safety position and if you pull the trigger to fire the hammer should not fall. The trick to setting the Safety this way is to remove your finger very quickly from the trigger when dropping the hammer into the Safety position.
Warning: When the chamber is loaded, never place the hammer in the fired (down) position (#3 Figure A).
Warning: The safety is designed to secure the hammer, holding it from contacting the firing pin. However, this mechanism will not necessarily prevent the accidental discharge of this firearm as a result of jarring, abuse or mishandling.
HOW TO PLACE THE HAMMER IN THE SAFETY POSITION
There are two ways to set the hammer into the Safety position. Always keep the gun pointed in a safe direction. With the hammer in the fired (down) position (#3 Figure A), cock the hammer back slightly, about a 1/16th to a 1/8th of an inch, until you feel and hear the hammer click into the Safety position (#2 Figure A). The hammer and trigger will now be locked into the Safety position and, if you pull the trigger to fire, the trigger should not move and the hammer should not fall.
The second way to set the safety is to cock the hammer all the way by pulling the forearm back, thus opening the action and pushing the hammer back into the fully-cocked position (#1 Figure A). Then push the forearm fully forward closing the action. Warning: This causes a round to be loaded into the chamber and the gun is now ready to fire! Now firmly hold the hammer back with your thumb. While holding the hammer, apply just enough pressure on the trigger to release the hammer from the full cock position. Remove your finger from the trigger very quickly and slowly lower the hammer into the Safety position. The hammer will now be locked into the Safety position and if you pull the trigger to fire the hammer should not fall. The trick to setting the Safety this way is to remove your finger very quickly from the trigger when dropping the hammer into the Safety position.
Warning: When the chamber is loaded, never place the hammer in the fired (down) position (#3 Figure A).
Warning: The safety is designed to secure the hammer, holding it from contacting the firing pin. However, this mechanism will not necessarily prevent the accidental discharge of this firearm as a result of jarring, abuse or mishandling.
How to LoadPrior to loading your rifle, make certain that the rifle is not already loaded. Point the muzzle in a safe direction and pull the forearm back to open the action. If a cartridge ejects, proceed with directions on how to unload the magazine tube and empty and clear the chamber. We recommend that you always load a completely unloaded firearm and clear the firearm of any cartridges prior to loading.
Assuming that you are now handling an unloaded firearm, make certain that the barrel, receiver and chamber are free from any grease, oil debris or any other obstruction. Make certain that the ammunition you are about to use is .22 rimfire caliber. Make certain that you are using name-brand, top quality ammunition. With your new Henry Pump Action .22, you can use .22 Long Rifle, .22 Long or .22 Short. The capacity for .22 Long Rifle is 15 rounds, .22 Long 15-17 rounds, and for .22 Short it is 21 rounds. WARNING: You cannot use .22 Magnum rounds in a .22LR or vice versa.
To load the magazine tube, first place the hammer in the Safety Position. To place the hammer into the Safety Position, first point the muzzle in a safe direction. Next, cock the hammer by pulling the forearm back then pushing it forward. Then, firmly hold the hammer back with your thumb.
IMPORTANT: Now, while holding the hammer back with your thumb, apply just a little bit of pressure on the trigger to release the hammer from the full-cock position (Figure A-1) and immediately and simultaneously remove your finger from the trigger. Slowly and carefully allow the hammer to lower into the Safety position. (Figure A-2)
You are now ready to load.
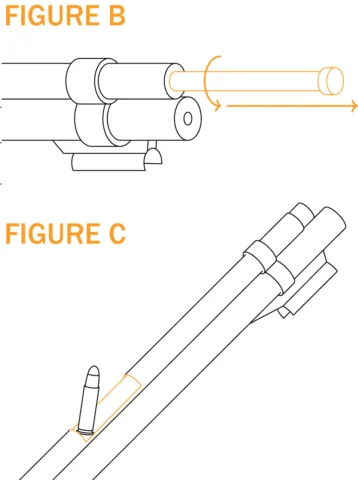
Twist the inner magazine tube by disengaging the magazine button (Figure B) and pulling the tube out until the orange colored follower is visible through and clears the loading port in the outer magazine tube.
With the muzzle pointed upward, insert the rimmed end of the cartridges into the magazine (Figure C) and allow them to slide down towards the action. Do not exceed the capacity of the magazine. Next, push the inner magazine tube back down into position and lock into place. Please be careful when pushing the inner magazine tube in, as it is under spring tension.
The rifle is now ready for operation.
Prior to loading your rifle, make certain that the rifle is not already loaded. Point the muzzle in a safe direction and pull the forearm back to open the action. If a cartridge ejects, proceed with directions on how to unload the magazine tube and empty and clear the chamber. We recommend that you always load a completely unloaded firearm and clear the firearm of any cartridges prior to loading.
Assuming that you are now handling an unloaded firearm, make certain that the barrel, receiver and chamber are free from any grease, oil debris or any other obstruction. Make certain that the ammunition you are about to use is .22 rimfire caliber. Make certain that you are using name-brand, top quality ammunition. With your new Henry Pump Action .22, you can use .22 Long Rifle, .22 Long or .22 Short. The capacity for .22 Long Rifle is 15 rounds, .22 Long 15-17 rounds, and for .22 Short it is 21 rounds. WARNING: You cannot use .22 Magnum rounds in a .22LR or vice versa.
To load the magazine tube, first place the hammer in the Safety Position. To place the hammer into the Safety Position, first point the muzzle in a safe direction. Next, cock the hammer by pulling the forearm back then pushing it forward. Then, firmly hold the hammer back with your thumb.
IMPORTANT: Now, while holding the hammer back with your thumb, apply just a little bit of pressure on the trigger to release the hammer from the full-cock position (Figure A-1) and immediately and simultaneously remove your finger from the trigger. Slowly and carefully allow the hammer to lower into the Safety position. (Figure A-2)
You are now ready to load.
Twist the inner magazine tube by disengaging the magazine button (Figure B) and pulling the tube out until the orange colored follower is visible through and clears the loading port in the outer magazine tube.
With the muzzle pointed upward, insert the rimmed end of the cartridges into the magazine (Figure C) and allow them to slide down towards the action. Do not exceed the capacity of the magazine. Next, push the inner magazine tube back down into position and lock into place. Please be careful when pushing the inner magazine tube in, as it is under spring tension.
The rifle is now ready for operation.
Cleaning, Storage and Maintenance
Parts
List of Parts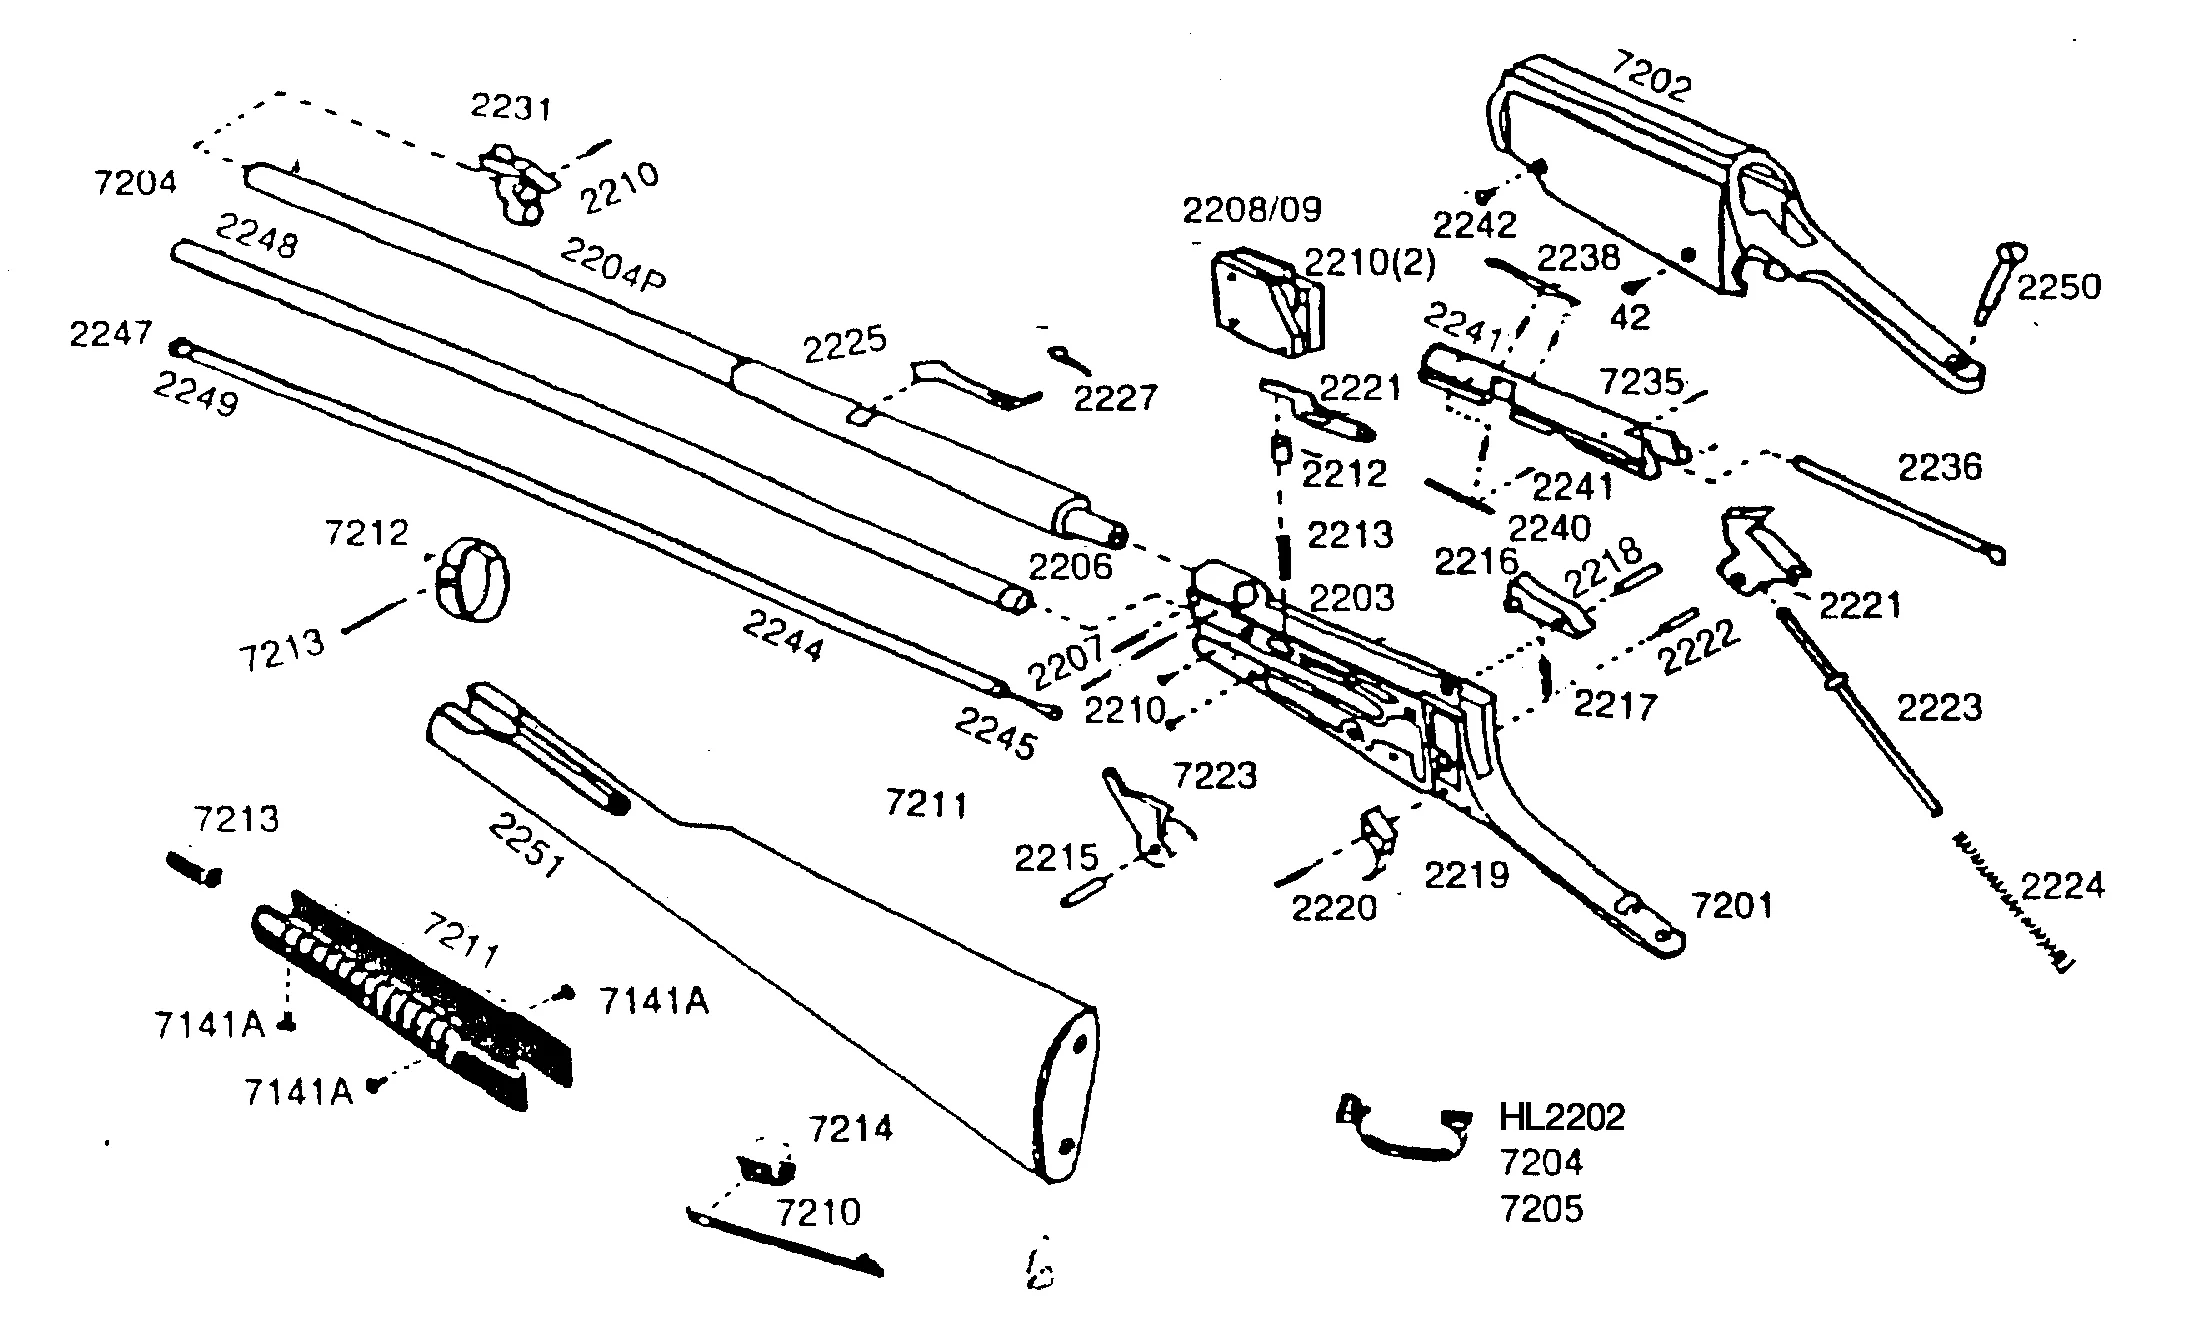
01Receiver
02Cover
03Carrier Level Axle (22 LR Only)
04Barrel
07Taper Pin
08/09Carrier
10Carrier Screw
11Carrier Feed Lever
12Carrier Feed Lever Plunger
13Carrier Feed Lever Spring
14Lever
15Lever Pin
16Locking Bar
17Lock Bar Spring
18Lock Bar Pin
19Trigger
20Trigger Spring
21Hammer
22Hammer Pin
23Hammer Spring Guide
24Hammer Spring
25-1Rear Sight
25-2Buckhorn Insert
25-3Buckhorn Insert Screw
25-4Buckhorn Screw
29Barrel Band
30Barrel Band Screw
31Front Sight
35Bolt
36Firing Pin
37Firing Pin Spring
38Extractor
38SExtractor Spring
39Ejector Spring
40Ejector
41Retaining Pin (For Firing Pin, Extractor & Ejector)
42Cover Screw
42WCover Screw Washer
44Inner Magazine Tube
45Follower
46Magazine Tube Spring
47Knob
48Outer Magazine Tube
49Stud Pin
49-1Front Sight Bead
50Stock Screw
51Buttstock
52Forearm
53Buttplate Screw
54Trigger Pin
56Magazine Tube Support
56OInner Magazine Tube O-Ring
57Buttplate
62ARear Sight Elevator
Receiver
Cover
Carrier Level Axle (22 LR Only)
Barrel
Taper Pin
Carrier
Carrier Screw
Carrier Feed Lever
Carrier Feed Lever Plunger
Carrier Feed Lever Spring
Lever
Lever Pin
Locking Bar
Lock Bar Spring
Lock Bar Pin
Trigger
Trigger Spring
Hammer
Hammer Pin
Hammer Spring Guide
Hammer Spring
Rear Sight
Buckhorn Insert
Buckhorn Insert Screw
Buckhorn Screw
Barrel Band
Barrel Band Screw
Front Sight
Bolt
Firing Pin
Firing Pin Spring
Extractor
Extractor Spring
Ejector Spring
Ejector
Retaining Pin (For Firing Pin, Extractor & Ejector)
Cover Screw
Cover Screw Washer
Inner Magazine Tube
Follower
Magazine Tube Spring
Knob
Outer Magazine Tube
Stud Pin
Front Sight Bead
Stock Screw
Buttstock
Forearm
Buttplate Screw
Trigger Pin
Magazine Tube Support
Inner Magazine Tube O-Ring
Buttplate
Rear Sight Elevator