


The Henry Guarantee

We are confident that you’ll enjoy and be proud to own any of our Henry firearms, well known for their reliability, accuracy, handsome looks and smooth action.
Our goal has and always will be to manufacture a line of classic, well-crafted firearms that every enthusiast would find readily affordable.
We take great pride in manufacturing our shotguns in the United States, hence our corporate motto “Made in America, or Not Made at All”.
Thank you very much for spending your hard earned money to purchase a Henry. I certainly appreciate it and welcome you to the Henry family. As an owner of a Henry, you are backed by our lifetime warranty and my personal guarantee for 100% satisfaction. I will do what it takes to make certain you are happy with your purchase.
Sincerely,
Anthony Imperato
Henry Repeating Arms
Telephone: 201.858.4400
Simple Limited Lifetime Warranty
It is our promise to you that as long as you own your Henry firearm, it will be free from defects in material and workmanship from the manufacturer. If you have a problem with your Henry firearm, we will fix it at no charge to you. Henry Repeating Arms shall repair, send replacement parts or replace the firearm with a valid warranty claim. If a complete replacement is necessary, the original firearm will not be returned. Henry RAC will provide repairs or replacement at no charge, but will not offer cash, credit, or refund.
WE RESERVE THE RIGHT TO REFUSE SERVICE ON FIREARMS THAT HAVE BEEN ALTERED, ADDED TO, OR SUBSTANTIALLY CHANGED.
Removal of metal from the barrel, or modifications of the firing mechanism and/or operating parts, may lead to a refusal of service on such firearms. There will be a charge for parts and labor to return the firearm to original specifications.
DO NOT, UNDER ANY CIRCUMSTANCES, ALTER THE TRIGGER, “SAFETY” OR OTHER PARTS OF FIRING MECHANISM OF THIS OR ANY OTHER FIREARM. FAILURE TO OBEY THIS WARNING MAY RESULT IN INJURY OR DEATH.
NOTICE: Henry RAC shall not be responsible for injury, death, or damage to property resulting from either intentional or accidental discharge of this firearm, or from its function when used for purposes or subjected to treatment for which it is not designed.
Whether or not you are experienced in the safe handling of firearms, we urge you to read this entire instruction manual carefully. You must follow the safety instructions for your safety and the safety of others. Should you have any questions concerning the instructions in this manual, please call us at 201-858-4400.
WARNING: If you have little or no experience in the safe handling and operation of a firearm, we strongly urge you to take a firearms safety course from an NRA Certified Instructor or someone with equivalent qualifications before using this or any other firearm. You can contact the NRA Firearms Education and Safety Division at 703-267-1470 for the name of an instructor in your area, or contact your firearms dealer, law enforcement agency or local sportsman’s club for training.
General Gun Safety Handling
Apply the following safety rules in every situation, with any kind of firearm:
ALWAYS TREAT EVERY FIREARM AS IF IT IS LOADED AND WILL FIRE. Do not take anyone’s word that the firearm is unloaded – always check for yourself. Never pass your firearm to another person until the cylinder or action is open and you visually check that it is unloaded. Keep your firearm unloaded and safely stored when not in use.
ALWAYS BE SURE OF YOUR TARGET AND WHAT IS BEYOND. A bullet could travel through or past your target for up to 1½ miles. Always be sure your backstop is adequate to stop and contain bullets before beginning target practice so that you do not hit anything outside the range shooting area. If in doubt, don’t shoot! Do not fire randomly into the sky.
NEVER SHOOT ACROSS A HIGHWAY OR ANOTHER ROADWAY.
ALWAYS POINT YOUR FIREARM IN A SAFE DIRECTION. NEVER point a firearm at anyone or anything you do not intend to shoot whether or not it is loaded. This is particularly important when loading, unloading, or field stripping the firearm. ALWAYS control the direction of the firearm; if it fires accidentally, injury, death, or damage to property can be avoided.
NEVER PLACE YOUR FINGER INSIDE THE TRIGGER GUARD OR ON THE TRIGGER UNLESS YOU INTEND TO FIRE. You should also take care to ensure that other objects do not touch the trigger.
NEVER USE ALCOHOL OR DRUGS BEFORE OR WHILE SHOOTING. Your vision, motor skills and judgment could be dangerously impaired, making your gun handling unsafe to you and to others. Further, do not use your firearm if you are on any medication which impairs, even slightly, your mental or physical ability.
ALWAYS SEEK A DOCTOR’S ADVICE IF YOU ARE TAKING MEDICATION. Be sure you are fit to shoot and handle your firearm safely.
NEVER SHOOT AT A HARD SURFACE SUCH AS A ROCK OR A LIQUID SURFACE SUCH AS WATER. A bullet may ricochet and travel in any direction to strike you or an object you cannot see, causing injury, death or damage to property.
NEVER DISCHARGE A FIREARM NEAR FLAMMABLE MATERIAL. Flame and sparks erupt from the firearm when discharged. They could start a fire or cause flammable liquids to explode.
ALWAYS BE AWARE OF POSSIBLE RISK FROM DROPPING YOUR FIREARM. Some parts of the mechanism could be damaged. You may not see the damage, but it could be severe. The firearm may discharge and cause injury, death, or damage to property. If your firearm has been dropped, have it examined by a competent gunsmith before using it again.
ALWAYS KEEP AND CARRY YOUR FIREARM EMPTY WITH THE HAMMER IN THE “SAFE” POSITION except when you intend to shoot, so that your firearm cannot be fired when you do not intend to fire it.
NEVER CROSS OBSTACLES SUCH AS FENCES OR STREAMS WITH A LOADED FIREARM. Always make certain your firearm is unloaded before crossing a fence, climbing a tree, jumping a ditch or approaching other obstacles.
NEVER TRANSPORT A LOADED FIREARM. Keep all firearms unloaded during transport, even when stored in a holster, gun case, scabbard or other container.
NEVER WALK, CLIMB, OR FOLLOW A COMPANION WITH YOUR FIREARM COCKED AND READY TO FIRE. When hunting, hold your firearm so that you can always control the direction of the muzzle.
NEVER LEAVE A LOADED FIREARM UNATTENDED. Someone, especially a child, may fire it and cause injury, death, or damage to property.
ALWAYS INSTRUCT CHILDREN AND NON SHOOTERS TO RESPECT FIREARMS. If you teach your children to shoot or get them trained by a qualified instructor, be certain they know how to use the firearm properly and always supervise them closely. Always stress safety so that your children or others will not fire a rifle when or where it is unsafe to do so.
Terminology & Descriptions
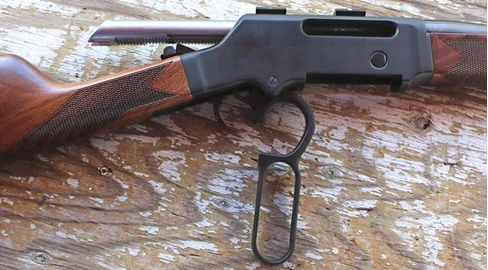
Congratulations on your purchase of your Henry Long Ranger (H014 models).
The Long Ranger is a dependable 7 lb. rifle with side ejection and a lightweight aerospace alloy receiver. The top is drilled and tapped for scope mounts, and the bottom features a steel-bodied flush-fit detachable magazine with a steel floor plate and a blackened steel release button on the right side of the receiver. It features a round sporter barrel, which is supported by an American Walnut stock with precise laser-cut checkering, sling swivel studs and a solid black rubber recoil pad for both recoil control and non-slip anchoring on the shoulder for the rapid follow-up shots.
The Long Ranger carries on the in-hammer sliding transfer bar as a safety and retains a traditional lever action operation with exposed hammer and forged steel lever.
HENRY LONG RANGER .223 Rem / 5.56 NATO / .243 Win / .308 Win / .338 Fed / 6.5 CREEDMOOR
Specifications

Lever Action Repeater
H014-223 – .223 Rem/5.56NATO
H014-243 – .243 Win
H014-308 – .308 Win
H014-338 – .338 Fed
H014-6.5 – 6.5 Creedmoor
H014S/H014D/H014WL-223 – .223 Rem/5.56NATO
H014S/H014D/H014WL-243 – .243 Win
H014S/H014D/H014WL-308 – .308 Win
H014S-338 – .338 Fed
H014S-6.5 – 6.5 Creedmoor
.223 Rem/5.56 NATO – 5 rounds
.243 Win – 4 rounds
.308 Win – 4 rounds
.338 Fed – 4 rounds
6.5 CM – 4 rounds
H014 and H014S – Hard Anodized Black
H014D – Polished Brass
H014WL – Nickel Plated w 24K Gold
20″ Round – .223, .243, .308
22″ Round – .338, 6.5 CM
.223 = 1:9
.243, .308, .338 = 1:10
6.5 = 1:8
H014-223/243/308 – 40.5″
H014-338/6.5 – 42.5″
7 lbs.
H014-223/243/308/338/6.5 = None
H014S/H014D/H014WL-
223/243/308/338/6.5 =
Folding Fully Adjustable
H014-223/243/308/338/6.5 = None
H014S/H014D/H014WL-
223/243/308/338/6.5 =
Ramp w/ .062″ Ivory Bead
Included with non-sighted models
American Walnut Checkered Straight Grip
Black Solid Rubber Recoil Pad
14″
Transfer Bar
Ammunition
Your Henry Long Ranger uses a detachable box for quick-reloading convenience. Be sure to use the ammunition particular to your purchased firearm. The Henry Long Ranger comes in the following calibers:
.223 Rem/5.56 NATO
.243 Win
.308 Win
.338 Fed
6.5 Creedmoor
THE CALIBER OF YOUR LONG RANGER LEVER ACTION IS INSCRIBED ON THE TOP OF THE RECEIVER AS WELL AS ON THE BARREL.
ALWAYS HAVE ADEQUATE VENTILATION IN THE AREA THAT YOU DISCHARGE A FIREARM. LEAD EXPOSURE CAN OCCUR FROM DISCHARGING FIREARMS IN POORLY VENTILATED AREAS, CLEANING FIREARMS OR HANDLING AMMUNITION.
Lead is a substance that has been known to cause birth defects, reproductive harm and other serious injury. Wash hands thoroughly after exposure.
Ammunition SelectionALWAYS USE THE CORRECT AMMUNITION FOR YOUR PARTICULAR FIREARM.
Henry Repeating Arms Firearms are designed to function with a variety of brands and types of factory manufactured ammunition in the appropriate caliber, but not all ammunition produces the same result. Be sure the only ammunition you carry correctly matches the gauge or caliber you are shooting. Never use non-standard, reloaded, or “hand-loaded” ammunition which has not been subjected to internal ballistic pressure testing. Henry RAC recommends that after you read and understand this manual, you go to the range and fire different ammunition which is appropriate to the caliber of your firearm. Once you find the ammunition which functions best, keep using it.
ALWAYS USE THE CORRECT AMMUNITION FOR YOUR PARTICULAR FIREARM.
Henry Repeating Arms Firearms are designed to function with a variety of brands and types of factory manufactured ammunition in the appropriate caliber, but not all ammunition produces the same result. Be sure the only ammunition you carry correctly matches the gauge or caliber you are shooting. Never use non-standard, reloaded, or “hand-loaded” ammunition which has not been subjected to internal ballistic pressure testing. Henry RAC recommends that after you read and understand this manual, you go to the range and fire different ammunition which is appropriate to the caliber of your firearm. Once you find the ammunition which functions best, keep using it.
Range and Shooting Cautions
ALWAYS DESIGNATE A KNOWLEDGEABLE AND RESPONSIBLE PERSON TO BE IN CHARGE TO MAINTAIN SAFETY CONTROL WHEN A GROUP IS FIRING ON A RANGE. Obey their commands so that discipline is maintained to reduce the possibility of accidents.
ALWAYS CARRY YOUR FIREARM EMPTY WITH THE ACTION OPEN WHILE ON A RANGE until preparing to fire and keep it pointing towards the backstop when loading, firing, and unloading to eliminate the risk of injury, death or damage to property.
ALWAYS KEEP THE HAMMER IN THE uncocked POSITION UNTIL YOU ARE READY TO FIRE. This will minimize the risk of an accidental discharge.
ALWAYS WEAR EYE AND EAR PROTECTION SPECIFIED FOR USE WITH FIREARMS. Flying particles could damage eyes and cause blindness. Without ear protection, the noise of even one shot from your rifle and from other guns close to you could leave a “ringing” in the ears for some time after firing and the cumulative long term effect could be permanent hearing loss. Make sure others in the vicinity of where you are shooting are doing so as well.
ALWAYS KEEP CLEAR AND KEEP OTHERS CLEAR OF THE EJECTION PORT. Spent shells are ejected with enough force to cause injury. The ejection port must also be unobstructed by your hand to insure safe ejection of spent rounds. Never place fingers in ejection port – they could be burned by hot metal or injured by the bolt moving forward.
NEVER PUT YOUR FINGER INSIDE THE TRIGGER GUARD UNTIL YOU ARE AIMING AT A TARGET AND READY TO SHOOT. This will prevent you from firing the firearm when it is pointing in an unsafe direction.
NEVER JOKE AROUND OR ENGAGE IN “HORSEPLAY” WHILE HANDLING YOUR FIREARM. Doing so could cause an accidental discharge.
Operating Instructions
Transfer Bar SafetyThis firearm is designed with an ultra-safe patented Transfer Bar Safety Mechanism. This safety system prevents the gun from being fired under all circumstances, except when the hammer is fully cocked and the trigger is pulled. If the hammer is fully cocked and the trigger is pulled, the gun would fire as normal. However, if the hammer is fully cocked and is accidentally dislodged by some other means other than the trigger being pulled, the gun will not fire. If the hammer is in the process of being cocked and is accidentally released and dropped into the fired down position, before it is fully cocked, the gun will not fire. This rifle can be safely carried fully loaded with the hammer in the fired down resting position. Please note that this rifle does not have a half cock safety position nor a crossbolt safety. If you do not have a full understanding of how the safety system works, please call us immediately at 201-858-4400 and ask for technical assistance.
This firearm is designed with an ultra-safe patented Transfer Bar Safety Mechanism. This safety system prevents the gun from being fired under all circumstances, except when the hammer is fully cocked and the trigger is pulled. If the hammer is fully cocked and the trigger is pulled, the gun would fire as normal. However, if the hammer is fully cocked and is accidentally dislodged by some other means other than the trigger being pulled, the gun will not fire. If the hammer is in the process of being cocked and is accidentally released and dropped into the fired down position, before it is fully cocked, the gun will not fire. This rifle can be safely carried fully loaded with the hammer in the fired down resting position. Please note that this rifle does not have a half cock safety position nor a crossbolt safety. If you do not have a full understanding of how the safety system works, please call us immediately at 201-858-4400 and ask for technical assistance.
Maintenance Before UseBefore using your firearm for the first time, it should be cleaned. (See the cleaning instructions.) Your firearm was treated at the factory with either a preservative or oil to protect it against corrosion during shipping and storage. Preservative and oil should be wiped from the bore, chamber and exposed areas using a clean swab or patch before using the firearm.
Purchase cleaning supplies that are specifically designated for your type and caliber of firearm. Many suppliers offer these in kit form for your convenience. Follow the instructions provided. Whenever your firearm has been exposed to sand, dust, extreme humidity, water or other adverse conditions, it should be cleaned and lubricated.
Before using your firearm for the first time, it should be cleaned. (See the cleaning instructions.) Your firearm was treated at the factory with either a preservative or oil to protect it against corrosion during shipping and storage. Preservative and oil should be wiped from the bore, chamber and exposed areas using a clean swab or patch before using the firearm.
Purchase cleaning supplies that are specifically designated for your type and caliber of firearm. Many suppliers offer these in kit form for your convenience. Follow the instructions provided. Whenever your firearm has been exposed to sand, dust, extreme humidity, water or other adverse conditions, it should be cleaned and lubricated.
How to Load Your Henry RifleThis rifle is equipped with a flush mount, all steel, detachable box magazine that holds cartridges in a staggered column. To release the magazine push the magazine release button on the right side of the receiver and pull down on the magazine. (There is a spring behind the magazine release button, which ensures that the magazine will not be inadvertently released). Press rounds downward into the magazine until they are retained into place. Once the magazine is fully loaded, or loaded with the desired amount of ammunition, it can be inserted back into the receiver where it will click into place.
It is best to insert a loaded magazine with the bolt closed and then cycle the action to feed a cartridge into the chamber.
The Long Ranger can be single loaded, as long as the magazine is in place, by inserting the nose of a cartridge into the chamber and closing the bolt. The small extractor hook easily rides over the case rim when the bolt is closed.
NOTE: The lever should be closed or towards the closed/chambered position to remove or insert the magazine.
DO NOT EXCEED THE CAPACITY OF THE MAGAZINE WHICH IS 5 ROUNDS ON THE .223 AND 4 ROUNDS ON THE .243, .308, .338 and 6.5.
This rifle is equipped with a flush mount, all steel, detachable box magazine that holds cartridges in a staggered column. To release the magazine push the magazine release button on the right side of the receiver and pull down on the magazine. (There is a spring behind the magazine release button, which ensures that the magazine will not be inadvertently released). Press rounds downward into the magazine until they are retained into place. Once the magazine is fully loaded, or loaded with the desired amount of ammunition, it can be inserted back into the receiver where it will click into place.
It is best to insert a loaded magazine with the bolt closed and then cycle the action to feed a cartridge into the chamber.
The Long Ranger can be single loaded, as long as the magazine is in place, by inserting the nose of a cartridge into the chamber and closing the bolt. The small extractor hook easily rides over the case rim when the bolt is closed.
NOTE: The lever should be closed or towards the closed/chambered position to remove or insert the magazine.
DO NOT EXCEED THE CAPACITY OF THE MAGAZINE WHICH IS 5 ROUNDS ON THE .223 AND 4 ROUNDS ON THE .243, .308, .338 and 6.5.
How to OperateThe rifle chamber can now be loaded by swinging the lever down/open completely and pulling it back into a closed position. Pull the hammer back into the cocked position. The rifle is now ready to be fired. If you are not yet ready to fire, then place your thumb on the hammer, and disengage the hammer by pulling the trigger slightly rearward. Immediately release the trigger while still holding the hammer, and bring the hammer into the fired down position. You now have the gun in loaded but safe to carry position. If you want to fire the gun, bring the hammer back to the cocked position, aim in a safe direction at your target, then pull the trigger.
The rifle chamber can now be loaded by swinging the lever down/open completely and pulling it back into a closed position. Pull the hammer back into the cocked position. The rifle is now ready to be fired. If you are not yet ready to fire, then place your thumb on the hammer, and disengage the hammer by pulling the trigger slightly rearward. Immediately release the trigger while still holding the hammer, and bring the hammer into the fired down position. You now have the gun in loaded but safe to carry position. If you want to fire the gun, bring the hammer back to the cocked position, aim in a safe direction at your target, then pull the trigger.
How to UnloadTo unload your Long Ranger, depress the magazine release button on the right hand side on the receiver and pull down on the magazine to remove it. Once the magazine is removed move the lever in a downward motion to open the action which will eject any live ammunition that is in the chamber. Be sure to double check the chamber to ensure the rifle is unloaded.
To unload your Long Ranger, depress the magazine release button on the right hand side on the receiver and pull down on the magazine to remove it. Once the magazine is removed move the lever in a downward motion to open the action which will eject any live ammunition that is in the chamber. Be sure to double check the chamber to ensure the rifle is unloaded.
Scope Mount Installation (Non-Sighted Models)Scope mounts improve the ease with which scopes are mounted on firearms. The mount allows scopes to be removed and reinstalled without losing the aiming point, or zero.
Use a gun cradle or padded bench vise to hold your firearm firmly and securely.
To install the included scopes mount on the H014 models, first check to see that the firearm is unloaded, then remove the filler screws on top of the receiver.
Use a degreasing agent to remove all traces of oil and grease from the mounting components including the rings, bases, and screws as well as the threaded mounting holes in the firearm’s receiver. Be sure to follow the safety protocols associated with whatever degreasing process you choose, including adequate ventilation.
Mount the bases to the receiver, paying careful attention that the slots are mounted in the correct position to allow the rings to interface correctly with the optic. Apply a very small amount of a substance like Surethread to the base of the screws. Use this liquid sparingly!
Use an adjustable torque wrench to apply the correct amount of torque to the mounting screws — torque specs vary, so you should refer to the directions of your mount you have chosen.
Tighten each screw a turn or two and then move to the next screw so that consistent pressure is maintained on all screws.
Refer to the instructions of your scope to complete the installation.
Scope mounts improve the ease with which scopes are mounted on firearms. The mount allows scopes to be removed and reinstalled without losing the aiming point, or zero.
Use a gun cradle or padded bench vise to hold your firearm firmly and securely.
To install the included scopes mount on the H014 models, first check to see that the firearm is unloaded, then remove the filler screws on top of the receiver.
Use a degreasing agent to remove all traces of oil and grease from the mounting components including the rings, bases, and screws as well as the threaded mounting holes in the firearm’s receiver. Be sure to follow the safety protocols associated with whatever degreasing process you choose, including adequate ventilation.
Mount the bases to the receiver, paying careful attention that the slots are mounted in the correct position to allow the rings to interface correctly with the optic. Apply a very small amount of a substance like Surethread to the base of the screws. Use this liquid sparingly!
Use an adjustable torque wrench to apply the correct amount of torque to the mounting screws — torque specs vary, so you should refer to the directions of your mount you have chosen.
Tighten each screw a turn or two and then move to the next screw so that consistent pressure is maintained on all screws.
Refer to the instructions of your scope to complete the installation.
Sights and Sight Adjustments (Sighted Models)If you purchased a sighted Long Ranger Rifle, it is equipped with a Folding, Fully Adjustable rear sight. The rear sight is adjustable for elevation (shooting high and low) and for windage (shooting left and right). The Folding Fully Adjustable Rear Sight is designed to fold down flat against the barrel on a rifle where another sight system, such as a scope, may also be used. The height adjustable sight notch piece, has a white enamel diamond that helps draw your eye to the center of the notch. It is also drilled and tapped for a Weaver 82 scope mount.
High Or Low (Elevation Adjustment)
Elevation adjustments are modified by raising or lowering the white diamond insert in the rear sight. Loosen the screw to the right of the white diamond, raise or lower as needed to correct elevation, then re-tighten the screw. In order to shoot higher, you need to raise the insert; if you want to shoot lower, then lower the insert.
Left Or Right (Windage Adjustment)
To adjust for windage (left/right), the rear sight can be moved left/right as desired by turning the screw on the side of the rear sight. If you want to shoot more to the right, turn the screw clockwise so the sight moves to the right. If you want to shoot more to the left, turn the screw counter clockwise so the sight moves to left.
If you purchased a sighted Long Ranger Rifle, it is equipped with a Folding, Fully Adjustable rear sight. The rear sight is adjustable for elevation (shooting high and low) and for windage (shooting left and right). The Folding Fully Adjustable Rear Sight is designed to fold down flat against the barrel on a rifle where another sight system, such as a scope, may also be used. The height adjustable sight notch piece, has a white enamel diamond that helps draw your eye to the center of the notch. It is also drilled and tapped for a Weaver 82 scope mount.
High Or Low (Elevation Adjustment)
Elevation adjustments are modified by raising or lowering the white diamond insert in the rear sight. Loosen the screw to the right of the white diamond, raise or lower as needed to correct elevation, then re-tighten the screw. In order to shoot higher, you need to raise the insert; if you want to shoot lower, then lower the insert.
Left Or Right (Windage Adjustment)
To adjust for windage (left/right), the rear sight can be moved left/right as desired by turning the screw on the side of the rear sight. If you want to shoot more to the right, turn the screw clockwise so the sight moves to the right. If you want to shoot more to the left, turn the screw counter clockwise so the sight moves to left.
Hammer Extension Installation (Non-Sighted Models)A hammer extension is useful when a scope is mounted. It extends to the side, making it convenient to cock and lower the hammer even with a low-mounted scope. The hammer extension can be used in either the right hand or left hand position. To install the included hammer extension first check to see that the rifle is unloaded, then place the hammer extension on the hammer in either the left or right hand position. Check to be sure the hammer extension is far enough down on the hammer and check that the location it is placed does not interfere with the operation of the hammer, rifle scope, or the lever action. Tighten down tension screw provided with allen wrench, hand tight.
A hammer extension is useful when a scope is mounted. It extends to the side, making it convenient to cock and lower the hammer even with a low-mounted scope. The hammer extension can be used in either the right hand or left hand position. To install the included hammer extension first check to see that the rifle is unloaded, then place the hammer extension on the hammer in either the left or right hand position. Check to be sure the hammer extension is far enough down on the hammer and check that the location it is placed does not interfere with the operation of the hammer, rifle scope, or the lever action. Tighten down tension screw provided with allen wrench, hand tight.
Malfunction and TroubleshootingNEVER USE YOUR FIREARM IF IT FAILS TO FUNCTION PROPERLY, AND NEVER FORCE A JAMMED ACTION. Forcing the action could make the round explode, causing serious injury, possible death, or severe damage to your firearm or other property.
FAILURE TO FIRE. A misfire occurs when the firing pin strikes the primer and it does not fire. IF THE FIREARM FAILS TO FIRE DO NOT PUT IT DOWN OR OPEN THE ACTION. ALWAYS HOLD THE FIREARM, KEEPING IT POINTED IN A SAFE DIRECTION AND WAIT 30 SECONDS. IF A HANGFIRE (SLOW IGNITION) HAS OCCURRED, THE ROUND WILL FIRE WITHIN 30 SECONDS.
If the round does not fire, remove the ammunition, eject the round and examine the shell. If the firing pin indent on the primer is light or non-existent, have the firearm examined by a competent gunsmith before firing again. If the firing pin indent on the primer appears normal (in comparison with similar previously fired rounds) assume you have faulty ammunition. Segregate the misfired round from other live ammunition and empty cases, reload, and carry on firing.
FAILURE TO EXTRACT (FTE). This is when the firearm discharges the round and fails to extract the spent round from the chamber. This could happen because of a bad extractor or bad/damaged casings.
FAILURE TO FEED (FTF). This is simply when the firearm fails to feed another round into the chamber. Put the lever in the open position and clear the ejection port.
Note: The ejection port should face the ground; this will allow the round to easily fall out (gravity is your friend here). This will work for both left and right handed shooters.
NEVER USE YOUR FIREARM IF IT FAILS TO FUNCTION PROPERLY, AND NEVER FORCE A JAMMED ACTION. Forcing the action could make the round explode, causing serious injury, possible death, or severe damage to your firearm or other property.
FAILURE TO FIRE. A misfire occurs when the firing pin strikes the primer and it does not fire. IF THE FIREARM FAILS TO FIRE DO NOT PUT IT DOWN OR OPEN THE ACTION. ALWAYS HOLD THE FIREARM, KEEPING IT POINTED IN A SAFE DIRECTION AND WAIT 30 SECONDS. IF A HANGFIRE (SLOW IGNITION) HAS OCCURRED, THE ROUND WILL FIRE WITHIN 30 SECONDS.
If the round does not fire, remove the ammunition, eject the round and examine the shell. If the firing pin indent on the primer is light or non-existent, have the firearm examined by a competent gunsmith before firing again. If the firing pin indent on the primer appears normal (in comparison with similar previously fired rounds) assume you have faulty ammunition. Segregate the misfired round from other live ammunition and empty cases, reload, and carry on firing.
FAILURE TO EXTRACT (FTE). This is when the firearm discharges the round and fails to extract the spent round from the chamber. This could happen because of a bad extractor or bad/damaged casings.
FAILURE TO FEED (FTF). This is simply when the firearm fails to feed another round into the chamber. Put the lever in the open position and clear the ejection port.
Note: The ejection port should face the ground; this will allow the round to easily fall out (gravity is your friend here). This will work for both left and right handed shooters.
Cleaning, Storage and Maintenance
Cleaning Safety PrecautionsWARNING: BEFORE PERFORMING CLEANING PROCEDURES, MAKE SURE THE HAMMER IS IN THE FIRED-DOWN POSITION, WHICH ALLOWS YOUR SAFETY TO FUNCTION AS DESIGNED. OPEN THE ACTION AND MAKE CERTAIN YOUR FIREARM IS COMPLETELY UNLOADED. KEEP THE MUZZLE POINTED IN A SAFE DIRECTION. FAILURE TO FOLLOW THESE WARNINGS COULD RESULT IN SERIOUS INJURY OR DEATH.
KEEP ALL AMMUNITION AWAY FROM THE CLEANING AREA. NEVER TEST THE MECHANICAL FUNCTION OF YOUR RIFLE WITH LIVE AMMUNITION. FAILURE TO FOLLOW THESE WARNINGS COULD RESULT IN SERIOUS INJURY OR DEATH.
NOTICE! It is very important that the bore of your rifle be cleaned thoroughly and promptly after shooting. Do not leave discharged (empty) cases in the chambers for any length of time, as the chemical composition of many cartridges contain moisture which can “sweat” out of the shell and onto the chambers’ surfaces, and possibly cause corrosion and rust.
WARNING: BEFORE PERFORMING CLEANING PROCEDURES, MAKE SURE THE HAMMER IS IN THE FIRED-DOWN POSITION, WHICH ALLOWS YOUR SAFETY TO FUNCTION AS DESIGNED. OPEN THE ACTION AND MAKE CERTAIN YOUR FIREARM IS COMPLETELY UNLOADED. KEEP THE MUZZLE POINTED IN A SAFE DIRECTION. FAILURE TO FOLLOW THESE WARNINGS COULD RESULT IN SERIOUS INJURY OR DEATH.
KEEP ALL AMMUNITION AWAY FROM THE CLEANING AREA. NEVER TEST THE MECHANICAL FUNCTION OF YOUR RIFLE WITH LIVE AMMUNITION. FAILURE TO FOLLOW THESE WARNINGS COULD RESULT IN SERIOUS INJURY OR DEATH.
NOTICE! It is very important that the bore of your rifle be cleaned thoroughly and promptly after shooting. Do not leave discharged (empty) cases in the chambers for any length of time, as the chemical composition of many cartridges contain moisture which can “sweat” out of the shell and onto the chambers’ surfaces, and possibly cause corrosion and rust.
How to CleanRegular cleaning is important in order for your gun to operate efficiently and safely. Taking proper care of it will also maintain its value and extend its life.
WE SUGGEST THAT YOU USE BIRCHWOOD CASEY GUN SHEATH OR A MILD SOLVENT such as Hoppe’s No. 9, Kleenbore or Breakfree.
NOTICE! DO NOT ATTEMPT TO TAKE YOUR FIREARM APART FURTHER THAN EXPLAINED IN THIS MANUAL.
Your firearm is a specialized, finely fitted mechanism. You may permanently damage it by attempting to disassemble the inner mechanisms. If further disassembly for service or cleaning is required, take your firearm to a qualified gunsmith. Your gun should be cleaned every time it is used. A minimum cleaning includes wiping down the action and oiling key parts. Regular maintenance will also include cleaning the barrel. In order to clean it, we suggest that you first open the action by cycling the lever forward. Inspect the chamber and bore for brass, copper and powder fouling. Using a brand name cleaning kit, run the cleaning rod down the bore from the breech towards the muzzle. A normal amount of powder residue can be expected and is not serious. It can usually be removed by repeating the above step, using a new patch saturated with solvent every time.
ALWAYS CLEAN FROM THE NATURAL DIRECTION OF THE BULLET. When you fire your gun, the powder residue and dirt are in the barrel. The chamber and receiver are clean. If you run a brush or patch from the muzzle end you will push this dirt, residue, and moisture into the chamber and receiver. This is a major cause of stuck cases or problems. If you push or pull a brush back toward the chamber, you will notice the brush will throw the debris from the bore back into the chamber. You do not have to disassemble this rifle in order to clean it sufficiently and to keep it operating properly.
USE A CLEAN PATCH SURFACE EACH TIME YOU GO DOWN THE BARREL. When you are using your firearm you will get abrasive dirt in the muzzle. The patch with solvent will flush this dirt out in the shortest distance. If you use this patch surface again, the dirt will be deposited in the chamber and neck. The next bullet down the barrel picks up this dirt and erodes the throat. This is the exact equivalent of cleaning in the wrong direction.
NEVER GO BACK AND FORTH REVERSING THE BRUSH. This will bend the bristles on the brush. This is the equivalent of bending a wire back and forth until it breaks. You will always ruin a brush if you reverse it while in the bore.
USE ONLY A FEW DROPS OF SOLVENT/LUBRICANT OIL. Use only the amount of solvent that the patch will absorb. If you use too much, the solvent or oil will drip down into the trigger mechanism; this will cause a gummy trigger. If you use too much oil, it will drain back toward the stock and could cause premature failure of the wood.
CENTER THE TOP AND ROD. BE CAREFUL NOT TO LET EITHER RUB THE BORE. All firearms record their history. This is the reason most people look down the barrel of a firearm. An experienced eye can tell the method of cleaning, the number of shots, and the gun maintenance applied to the firearm. Many marks are caused by people who carelessly let the tip or rod rub the inside the barrel.
NEVER RUN A BRUSH IN THE BARREL FIRST. This will damage the firearm. The brush will pick up dirt, moisture or powder residue and deposit it into the chamber or receiver. Never dip a brush in solvent. The solvent at the brush core will collect dirt and drop it into the receiver and chamber. Remember – Rust is neglect. Make sure all exposed metal surfaces are coated with a film of oil. After being subjected to damp weather, thoroughly wipe the bore and metal surfaces. Then apply a new film of oil. If exposed to a soaking rain, snow or salt spray, a more thorough cleaning and oiling may be necessary. Wipe the bolt clean of any debris with solvent and a patch or small rag. Spray the bolt with some gun oil. A gun brought out of prolonged storage should also be cleaned before shooting. Accumulated moisture and dirt, or solidified grease and oil, can prevent the gun from operating properly. We recommend the use of pull through cleaning kits or cleaning with a rod type kit. Overtime, depending on the amount of use and how it is stored, we do recommend that you take your Henry to a gunsmith to have it inspected at which time it can also be cleaned more thoroughly.
Regular cleaning is important in order for your gun to operate efficiently and safely. Taking proper care of it will also maintain its value and extend its life.
WE SUGGEST THAT YOU USE BIRCHWOOD CASEY GUN SHEATH OR A MILD SOLVENT such as Hoppe’s No. 9, Kleenbore or Breakfree.
NOTICE! DO NOT ATTEMPT TO TAKE YOUR FIREARM APART FURTHER THAN EXPLAINED IN THIS MANUAL.
Your firearm is a specialized, finely fitted mechanism. You may permanently damage it by attempting to disassemble the inner mechanisms. If further disassembly for service or cleaning is required, take your firearm to a qualified gunsmith. Your gun should be cleaned every time it is used. A minimum cleaning includes wiping down the action and oiling key parts. Regular maintenance will also include cleaning the barrel. In order to clean it, we suggest that you first open the action by cycling the lever forward. Inspect the chamber and bore for brass, copper and powder fouling. Using a brand name cleaning kit, run the cleaning rod down the bore from the breech towards the muzzle. A normal amount of powder residue can be expected and is not serious. It can usually be removed by repeating the above step, using a new patch saturated with solvent every time.
ALWAYS CLEAN FROM THE NATURAL DIRECTION OF THE BULLET. When you fire your gun, the powder residue and dirt are in the barrel. The chamber and receiver are clean. If you run a brush or patch from the muzzle end you will push this dirt, residue, and moisture into the chamber and receiver. This is a major cause of stuck cases or problems. If you push or pull a brush back toward the chamber, you will notice the brush will throw the debris from the bore back into the chamber. You do not have to disassemble this rifle in order to clean it sufficiently and to keep it operating properly.
USE A CLEAN PATCH SURFACE EACH TIME YOU GO DOWN THE BARREL. When you are using your firearm you will get abrasive dirt in the muzzle. The patch with solvent will flush this dirt out in the shortest distance. If you use this patch surface again, the dirt will be deposited in the chamber and neck. The next bullet down the barrel picks up this dirt and erodes the throat. This is the exact equivalent of cleaning in the wrong direction.
NEVER GO BACK AND FORTH REVERSING THE BRUSH. This will bend the bristles on the brush. This is the equivalent of bending a wire back and forth until it breaks. You will always ruin a brush if you reverse it while in the bore.
USE ONLY A FEW DROPS OF SOLVENT/LUBRICANT OIL. Use only the amount of solvent that the patch will absorb. If you use too much, the solvent or oil will drip down into the trigger mechanism; this will cause a gummy trigger. If you use too much oil, it will drain back toward the stock and could cause premature failure of the wood.
CENTER THE TOP AND ROD. BE CAREFUL NOT TO LET EITHER RUB THE BORE. All firearms record their history. This is the reason most people look down the barrel of a firearm. An experienced eye can tell the method of cleaning, the number of shots, and the gun maintenance applied to the firearm. Many marks are caused by people who carelessly let the tip or rod rub the inside the barrel.
NEVER RUN A BRUSH IN THE BARREL FIRST. This will damage the firearm. The brush will pick up dirt, moisture or powder residue and deposit it into the chamber or receiver. Never dip a brush in solvent. The solvent at the brush core will collect dirt and drop it into the receiver and chamber. Remember – Rust is neglect. Make sure all exposed metal surfaces are coated with a film of oil. After being subjected to damp weather, thoroughly wipe the bore and metal surfaces. Then apply a new film of oil. If exposed to a soaking rain, snow or salt spray, a more thorough cleaning and oiling may be necessary. Wipe the bolt clean of any debris with solvent and a patch or small rag. Spray the bolt with some gun oil. A gun brought out of prolonged storage should also be cleaned before shooting. Accumulated moisture and dirt, or solidified grease and oil, can prevent the gun from operating properly. We recommend the use of pull through cleaning kits or cleaning with a rod type kit. Overtime, depending on the amount of use and how it is stored, we do recommend that you take your Henry to a gunsmith to have it inspected at which time it can also be cleaned more thoroughly.
Maintenance Before StorageWhen storing your firearm, do not encase it in anything that will attract or hold moisture, for example, leather or heavy cloth. Also, do not store firearms with a plug inserted in the barrel because this can be a contributing factor to moisture accumulation.
If your firearm is to be stored for an extended period, the bore, chamber and internal surfaces should be oiled with a high-quality lubricating oil or preservative intended for firearms. The external parts; receiver, bolt and barrel should be coated with an anti-rust oil.
Before using your firearm again, be sure to clean it. Every time you clean your firearm, check it for signs of wear. If wear is noted, do not use the firearm, have it checked by a qualified gunsmith.
Make sure your firearm is in good mechanical condition before firing it. Periodically have your firearm checked for signs of erosion, cracking, or wear by the factory or a factory certified gunsmith.
When storing your firearm, do not encase it in anything that will attract or hold moisture, for example, leather or heavy cloth. Also, do not store firearms with a plug inserted in the barrel because this can be a contributing factor to moisture accumulation.
If your firearm is to be stored for an extended period, the bore, chamber and internal surfaces should be oiled with a high-quality lubricating oil or preservative intended for firearms. The external parts; receiver, bolt and barrel should be coated with an anti-rust oil.
Before using your firearm again, be sure to clean it. Every time you clean your firearm, check it for signs of wear. If wear is noted, do not use the firearm, have it checked by a qualified gunsmith.
Make sure your firearm is in good mechanical condition before firing it. Periodically have your firearm checked for signs of erosion, cracking, or wear by the factory or a factory certified gunsmith.
Storage Safety and PrecautionsNEVER LOCK A LOADED FIREARM AND NEVER LOAD A LOCKED FIREARM!
ALWAYS CHECK TO MAKE SURE YOUR FIREARM IS NOT LOADED BEFORE CLEANING, STORING, TRANSPORTING IT, LAYING IT DOWN, OR HANDING IT TO ANOTHER PERSON so that it cannot be fired when it is unsafe to do so.
ALWAYS KEEP AND STORE YOUR FIREARM AND AMMUNITION IN SEPARATE, LOCKED LOCATIONS, OUT OF REACH AND SIGHT OF CHILDREN AND UNTRAINED PERSONS. Safe and secure storage of your firearm and ammunition are your responsibility.
NEVER LEAVE THE KEY TO THE LOCK FOR YOUR FIREARM WITH THE STORED FIREARM!
NEVER ASSUME THAT A “HIDING” PLACE IS A SECURE STORAGE METHOD. Others may be aware of your storage location or come upon it by chance. It is your personal responsibility to use common sense when storing your firearm and ammunition and to always make sure they are not accessible to children or other unauthorized persons.
NOTE: Do not store your firearm in an air-tight container, and do not seal or attempt to seal the barrel to exclude dust, as the internal steel surface is more likely to rust or corrode by doing this.
BEWARE OF BARREL OBSTRUCTIONS. Be sure the barrel is clear of obstructions before shooting. Mud, water, snow or other objects may inadvertently lodge in the barrel bore. A small obstruction can cause a dangerous increase in pressure and may damage your firearm and cause injury to yourself and others.
BEFORE CHECKING FOR A BARREL OBSTRUCTION, BE CERTAIN YOUR FIREARM IS COMPLETELY UNLOADED. After assuring yourself that the firearm is completely unloaded, open the action and look through the barrel to be sure it is clear of obstructions. If an obstruction is seen, no matter how small it may be, clean the bore with a cleaning cord or a patch as described in the CLEANING section of this owner’s manual.
BE SURE ALL ACCESSORIES, SUCH AS SLINGS, SCOPES AND OTHER ACCESSORIES ARE COMPATIBLE WITH YOUR PARTICULAR FIREARM AND THAT THE ACCESSORIES DO NOT INTERFERE WITH ITS SAFE OPERATION.
It is your responsibility to understand and follow all of the instructions in the safety manual that accompanied your firearm, as well as those which may be supplied with your ammunition and any accessory.
NEVER DISASSEMBLE YOUR FIREARM BEYOND THE FIELD STRIPPING PROCEDURE OUTLINED IN THIS MANUAL. Improper disassembly or reassembly of your firearm may be dangerous and can lead to serious injury or death.
NEVER MANIPULATE, ADJUST OR CHANGE ANY OF THE INTERNAL COMPONENTS OF YOUR FIREARM UNLESS SPECIFICALLY INSTRUCTED TO DO SO IN THIS MANUAL. Improper manipulation of any other internal component may affect the safety and reliability of your firearm and may cause serious injury or death.
NEVER ALLOW ANY ALTERATION OR REPLACEMENT OF PARTS IN YOUR FIREARM UNLESS PERFORMED BY A QUALIFIED GUNSMITH USING AUTHORIZED PARTS. If you do otherwise, improper functioning of your firearm may occur and serious injury or death and damage to property may result.
NEVER LOCK A LOADED FIREARM AND NEVER LOAD A LOCKED FIREARM!
ALWAYS CHECK TO MAKE SURE YOUR FIREARM IS NOT LOADED BEFORE CLEANING, STORING, TRANSPORTING IT, LAYING IT DOWN, OR HANDING IT TO ANOTHER PERSON so that it cannot be fired when it is unsafe to do so.
ALWAYS KEEP AND STORE YOUR FIREARM AND AMMUNITION IN SEPARATE, LOCKED LOCATIONS, OUT OF REACH AND SIGHT OF CHILDREN AND UNTRAINED PERSONS. Safe and secure storage of your firearm and ammunition are your responsibility.
NEVER LEAVE THE KEY TO THE LOCK FOR YOUR FIREARM WITH THE STORED FIREARM!
NEVER ASSUME THAT A “HIDING” PLACE IS A SECURE STORAGE METHOD. Others may be aware of your storage location or come upon it by chance. It is your personal responsibility to use common sense when storing your firearm and ammunition and to always make sure they are not accessible to children or other unauthorized persons.
NOTE: Do not store your firearm in an air-tight container, and do not seal or attempt to seal the barrel to exclude dust, as the internal steel surface is more likely to rust or corrode by doing this.
BEWARE OF BARREL OBSTRUCTIONS. Be sure the barrel is clear of obstructions before shooting. Mud, water, snow or other objects may inadvertently lodge in the barrel bore. A small obstruction can cause a dangerous increase in pressure and may damage your firearm and cause injury to yourself and others.
BEFORE CHECKING FOR A BARREL OBSTRUCTION, BE CERTAIN YOUR FIREARM IS COMPLETELY UNLOADED. After assuring yourself that the firearm is completely unloaded, open the action and look through the barrel to be sure it is clear of obstructions. If an obstruction is seen, no matter how small it may be, clean the bore with a cleaning cord or a patch as described in the CLEANING section of this owner’s manual.
BE SURE ALL ACCESSORIES, SUCH AS SLINGS, SCOPES AND OTHER ACCESSORIES ARE COMPATIBLE WITH YOUR PARTICULAR FIREARM AND THAT THE ACCESSORIES DO NOT INTERFERE WITH ITS SAFE OPERATION.
It is your responsibility to understand and follow all of the instructions in the safety manual that accompanied your firearm, as well as those which may be supplied with your ammunition and any accessory.
NEVER DISASSEMBLE YOUR FIREARM BEYOND THE FIELD STRIPPING PROCEDURE OUTLINED IN THIS MANUAL. Improper disassembly or reassembly of your firearm may be dangerous and can lead to serious injury or death.
NEVER MANIPULATE, ADJUST OR CHANGE ANY OF THE INTERNAL COMPONENTS OF YOUR FIREARM UNLESS SPECIFICALLY INSTRUCTED TO DO SO IN THIS MANUAL. Improper manipulation of any other internal component may affect the safety and reliability of your firearm and may cause serious injury or death.
NEVER ALLOW ANY ALTERATION OR REPLACEMENT OF PARTS IN YOUR FIREARM UNLESS PERFORMED BY A QUALIFIED GUNSMITH USING AUTHORIZED PARTS. If you do otherwise, improper functioning of your firearm may occur and serious injury or death and damage to property may result.
Parts
An illustration and list of part names are included in this manual. Please note that not all parts are available for sale. Those parts which are available should be installed by a licensed gunsmith. When ordering parts, please give part name and part number.
Important: If you make unauthorized adjustments or use unauthorized parts, Henry Repeating Arms Company will not assume responsibility for the proper functioning of the shotgun.
This gun is manufactured to perform properly with the original parts as designed. It is your duty to make sure any parts you buy are installed correctly and that neither replacements nor originals are altered or changed. This is why we say take it to a licensed gunsmith station. Your gun is a complex tool with many parts that must relate correctly to other parts. Putting a gun together wrong or with modified parts can result in a damaged gun, danger, and injury or death to you and others through malfunction. Always let a qualified gunsmith work on your gun and check any work you think was not performed by a gunsmith.
List of Parts
01Receiver
02Trigger Guard
03Hammer
04Trigger
05Sear
06Rocker
07Trigger Lock
08Sear/Rocker Spring
09Trigger Lock Spring
10Trigger/Sear Spring
11Trigger Lock Pin
12Gear Pin
13Transfer Bar
14Transfer Bar Pin
15Trigger/Rocker Link
16Bolt
17Firing Pin
18Bolt Pivot Pin
19Extractor
20Extractor Spring
21Mainspring Yoke Pin
22Trigger Plate Screw
23Lever
24Lever Plunger
25Lever Plunger Spring
26Lever Plunger Pin
27Bolt Carrier
29Drive Gear
30Pinion Gear
31Ejector
32Ejector Spring
33Mainspring Yoke
34Magazine Lifter
35Magazine Catch
36Barrel
37Magazine Outer Shell
38Magazine Base Cover
40Forearm Stud
41Firing Pin Return Spring
42Forearm Cap
431/4″ — 20 x 4.75″ Screw
441/4″ Lock Washer
45Hammer Pin
46#10-32 x 4.00″ Screw
47#10 Lock Washer
48#10 Flat Washer
49Ejector Retention Pin
50Hammer Mainspring
51Hammer Spring Piston
52Coupler
53Recoil Pad
54Buttstock
55Forearm
56Magazine Catch Leaf Spring
57Magazine Catch Screw
58Magazine Spring
59Orientation Key
601/4″ Flat Washer
61#8-40 Insert
62Front Sight Ramp
63Front Sight Ramp Screw
64Rear Sight
65Front Sight
66#10-1″ Wood Screw
67Lever Rotation Stop
68Recoil Pad Screw
70Firing Pin Return Spring
71Firing Pin Return
722 Piece Scope Mount
73Scope Mount Screw
74Lever Rack
75Lever Rack Plunger
76Lever Rack Plunger Spring
78Firing Pin Return Retaining Pin
80Rack Plunger Retaining Pin
81Lever Pivot Bushing
82Trigger Guard Screw
85Lever Detent Pin
Receiver
Trigger Guard
Hammer
Trigger
Sear
Rocker
Trigger Lock
Sear/Rocker Spring
Trigger Lock Spring
Trigger/Sear Spring
Trigger Lock Pin
Gear Pin
Transfer Bar
Transfer Bar Pin
Trigger/Rocker Link
Bolt
Firing Pin
Bolt Pivot Pin
Extractor
Extractor Spring
Mainspring Yoke Pin
Trigger Plate Screw
Lever
Lever Plunger
Lever Plunger Spring
Lever Plunger Pin
Bolt Carrier
Drive Gear
Pinion Gear
Ejector
Ejector Spring
Mainspring Yoke
Magazine Lifter
Magazine Catch
Barrel
Magazine Outer Shell
Magazine Base Cover
Forearm Stud
Firing Pin Return Spring
Forearm Cap
1/4″ — 20 x 4.75″ Screw
1/4″ Lock Washer
Hammer Pin
#10-32 x 4.00″ Screw
#10 Lock Washer
#10 Flat Washer
Ejector Retention Pin
Hammer Mainspring
Hammer Spring Piston
Coupler
Recoil Pad
Buttstock
Forearm
Magazine Catch Leaf Spring
Magazine Catch Screw
Magazine Spring
Orientation Key
1/4″ Flat Washer
#8-40 Insert
Front Sight Ramp
Front Sight Ramp Screw
Rear Sight
Front Sight
#10-1″ Wood Screw
Lever Rotation Stop
Recoil Pad Screw
Firing Pin Return Spring
Firing Pin Return
2 Piece Scope Mount
Scope Mount Screw
Lever Rack
Lever Rack Plunger
Lever Rack Plunger Spring
Firing Pin Return Retaining Pin
Rack Plunger Retaining Pin
Lever Pivot Bushing
Trigger Guard Screw
Lever Detent Pin
Servicing and Repair
If you believe that your Henry firearm requires repair or adjustment, we suggest that you first contact our Customer Service by visiting the “Contact Us” page on our website, or by phone at 201.858.4400. It may be a problem that we can resolve by phone or by sending a replacement part. For international customers please visit the “Contact Us” page on our website for instructions.
In the unlikely event that your firearm requires adjustments or repair, please make certain that it is unloaded and send it to us at the following address:
HRAC
Att: Repair Dept.
107 W. Coleman Street
Rice Lake, WI 54868
Enclose an explanation of the problem in as much detail as possible.
Make certain to include your complete name, address, phone number and serial number. Make sure your firearm is packaged to prevent it from being damaged. The package should be insured to protect against Loss or Theft.
Do not include “Henry Repeating Arms” in the address on the package, in order to prevent an inquisitive thief from being attracted to it by such information.
You can use the original box for return, however, you should make sure it is wrapped in a brown or other colored paper as to not indicate that the box contains a firearm. This helps to maintain the confidentiality of your rifle to ensure it gets back to us safely.