Henry .410 Lever Action Series

.410 Bore

Instruction Manual For All H018 Series Shotguns & Axe Models

H018 Shotguns & Axe Models

WARNING: BEFORE USING FIREARM, READ AND FOLLOW THESE INSTRUCTIONS.If there is anything you do not understand, get help from someone qualified to teach the safe handling of firearms.

Show Table of Contents

The Henry Guarantee

Anthony Guarantee

We are confident that you’ll enjoy and be proud to own any of our Henry firearms, well known for their reliability, accuracy, handsome looks and smooth action.

Our goal has and always will be to manufacture a line of classic, well-crafted firearms that every enthusiast would find readily affordable.

We take great pride in manufacturing our shotguns in the United States, hence our corporate motto “Made in America, or Not Made at All”.

Thank you very much for spending your hard earned money to purchase a Henry. I certainly appreciate it and welcome you to the Henry family. As an owner of a Henry, you are backed by our lifetime warranty and my personal guarantee for 100% satisfaction. I will do what it takes to make certain you are happy with your purchase.

Sincerely,

Anthony Imperato
Henry Repeating Arms
Telephone: 201.858.4400

Simple Limited Lifetime Warranty

It is our promise to you that as long as you own your Henry firearm, it will be free from defects in material and workmanship from the manufacturer. If you have a problem with your Henry firearm, we will fix it at no charge to you. Henry Repeating Arms shall repair, send replacement parts or replace the firearm with a valid warranty claim. If a complete replacement is necessary, the original firearm will not be returned. Henry RAC will provide repairs or replacement at no charge, but will not offer cash, credit, or refund.

WE RESERVE THE RIGHT TO REFUSE SERVICE ON FIREARMS THAT HAVE BEEN ALTERED, ADDED TO, OR SUBSTANTIALLY CHANGED.

Removal of metal from the barrel, or modifications of the firing mechanism and/or operating parts, may lead to a refusal of service on such firearms. There will be a charge for parts and labor to return the firearm to original specifications.

DO NOT, UNDER ANY CIRCUMSTANCES, ALTER THE TRIGGER, “SAFETY” OR OTHER PARTS OF FIRING MECHANISM OF THIS OR ANY OTHER FIREARM. FAILURE TO OBEY THIS WARNING MAY RESULT IN INJURY OR DEATH.

NOTICE: Henry RAC shall not be responsible for injury, death, or damage to property resulting from either intentional or accidental discharge of this firearm, or from its function when used for purposes or subjected to treatment for which it is not designed.

Whether or not you are experienced in the safe handling of firearms, we urge you to read this entire instruction manual carefully. You must follow the safety instructions for your safety and the safety of others. Should you have any questions concerning the instructions in this manual, please call us at 201-858-4400.

WARNING: If you have little or no experience in the safe handling and operation of a firearm, we strongly urge you to take a firearms safety course from an NRA Certified Instructor or someone with equivalent qualifications before using this or any other firearm. You can contact the NRA Firearms Education and Safety Division at 703-267-1470 for the name of an instructor in your area, or contact your firearms dealer, law enforcement agency or local sportsman’s club for training.

General Gun Safety Handling

Apply the following safety rules in every situation, with any kind of firearm:

ALWAYS TREAT EVERY FIREARM AS IF IT IS LOADED AND WILL FIRE.  Do not take anyone’s word that the firearm is unloaded – always check for yourself. Never pass your firearm to another person until the cylinder or action is open and you visually check that it is unloaded. Keep your firearm unloaded and safely stored when not in use.

ALWAYS BE SURE OF YOUR TARGET AND WHAT IS BEYOND. A bullet could travel through or past your target for up to 1½ miles.  Always be sure your backstop is adequate to stop and contain bullets before beginning target practice so that you do not hit anything outside the range shooting area.  If in doubt, don’t shoot! Do not fire randomly into the sky.

NEVER SHOOT ACROSS A HIGHWAY OR ANOTHER ROADWAY.

ALWAYS POINT YOUR FIREARM IN A SAFE DIRECTION.  NEVER point a firearm at anyone or anything you do not intend to shoot whether or not it is loaded. This is particularly important when loading, unloading, or field stripping the firearm. ALWAYS control the direction of the firearm; if it fires accidentally, injury, death, or damage to property can be avoided.

NEVER PLACE YOUR FINGER INSIDE THE TRIGGER GUARD OR ON THE TRIGGER UNLESS YOU INTEND TO FIRE.  You should also take care to ensure that other objects do not touch the trigger.

NEVER USE ALCOHOL OR DRUGS BEFORE OR WHILE SHOOTING.  Your vision, motor skills and judgment could be dangerously impaired, making your gun handling unsafe to you and to others.  Further, do not use your firearm if you are on any medication which impairs, even slightly, your mental or physical ability.

ALWAYS SEEK A DOCTOR’S ADVICE IF YOU ARE TAKING MEDICATION. Be sure you are fit to shoot and handle your firearm safely.

NEVER SHOOT AT A HARD SURFACE SUCH AS A ROCK OR A LIQUID SURFACE SUCH AS WATER. A bullet may ricochet and travel in any direction to strike you or an object you cannot see, causing injury, death or damage to property.

NEVER DISCHARGE A FIREARM NEAR FLAMMABLE MATERIAL. Flame and sparks erupt from the firearm when discharged. They could start a fire or cause flammable liquids to explode.

ALWAYS BE AWARE OF POSSIBLE RISK FROM DROPPING YOUR FIREARM. Some parts of the mechanism could be damaged. You may not see the damage, but it could be severe. The firearm may discharge and cause injury, death, or damage to property. If your firearm has been dropped, have it examined by a competent gunsmith before using it again.

ALWAYS KEEP AND CARRY YOUR FIREARM EMPTY WITH THE HAMMER IN THE “SAFE” POSITION except when you intend to shoot, so that your firearm cannot be fired when you do not intend to fire it.

NEVER CROSS OBSTACLES SUCH AS FENCES OR STREAMS WITH A LOADED FIREARM. Always make certain your firearm is unloaded before crossing a fence, climbing a tree, jumping a ditch or approaching other obstacles.

NEVER TRANSPORT A LOADED FIREARM. Keep all firearms unloaded during transport, even when stored in a holster, gun case, scabbard or other container.

NEVER WALK, CLIMB, OR FOLLOW A COMPANION WITH YOUR FIREARM COCKED AND READY TO FIRE. When hunting, hold your firearm so that you can always control the direction of the muzzle.

NEVER LEAVE A LOADED FIREARM UNATTENDED. Someone, especially a child, may fire it and cause injury, death, or damage to property.

ALWAYS INSTRUCT CHILDREN AND NON SHOOTERS TO RESPECT FIREARMS. If you teach your children to shoot or get them trained by a qualified instructor, be certain they know how to use the firearm properly and always supervise them closely. Always stress safety so that your children or others will not fire a rifle when or where it is unsafe to do so.

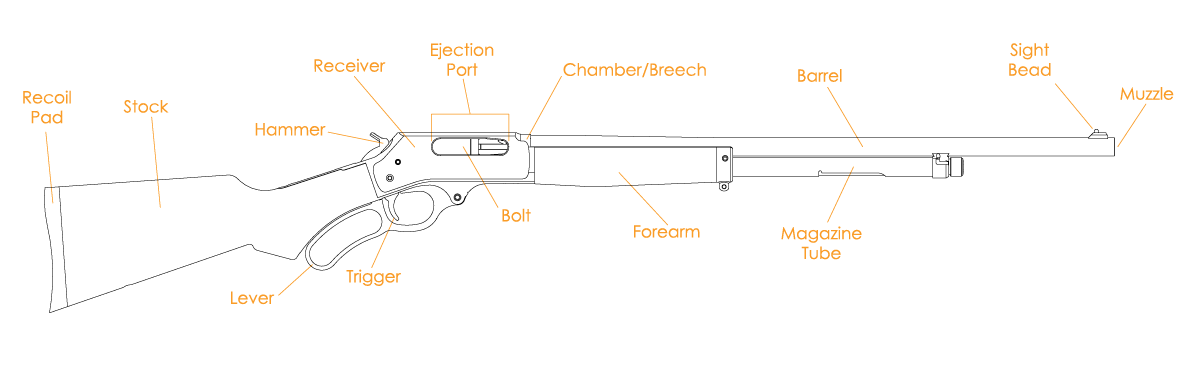
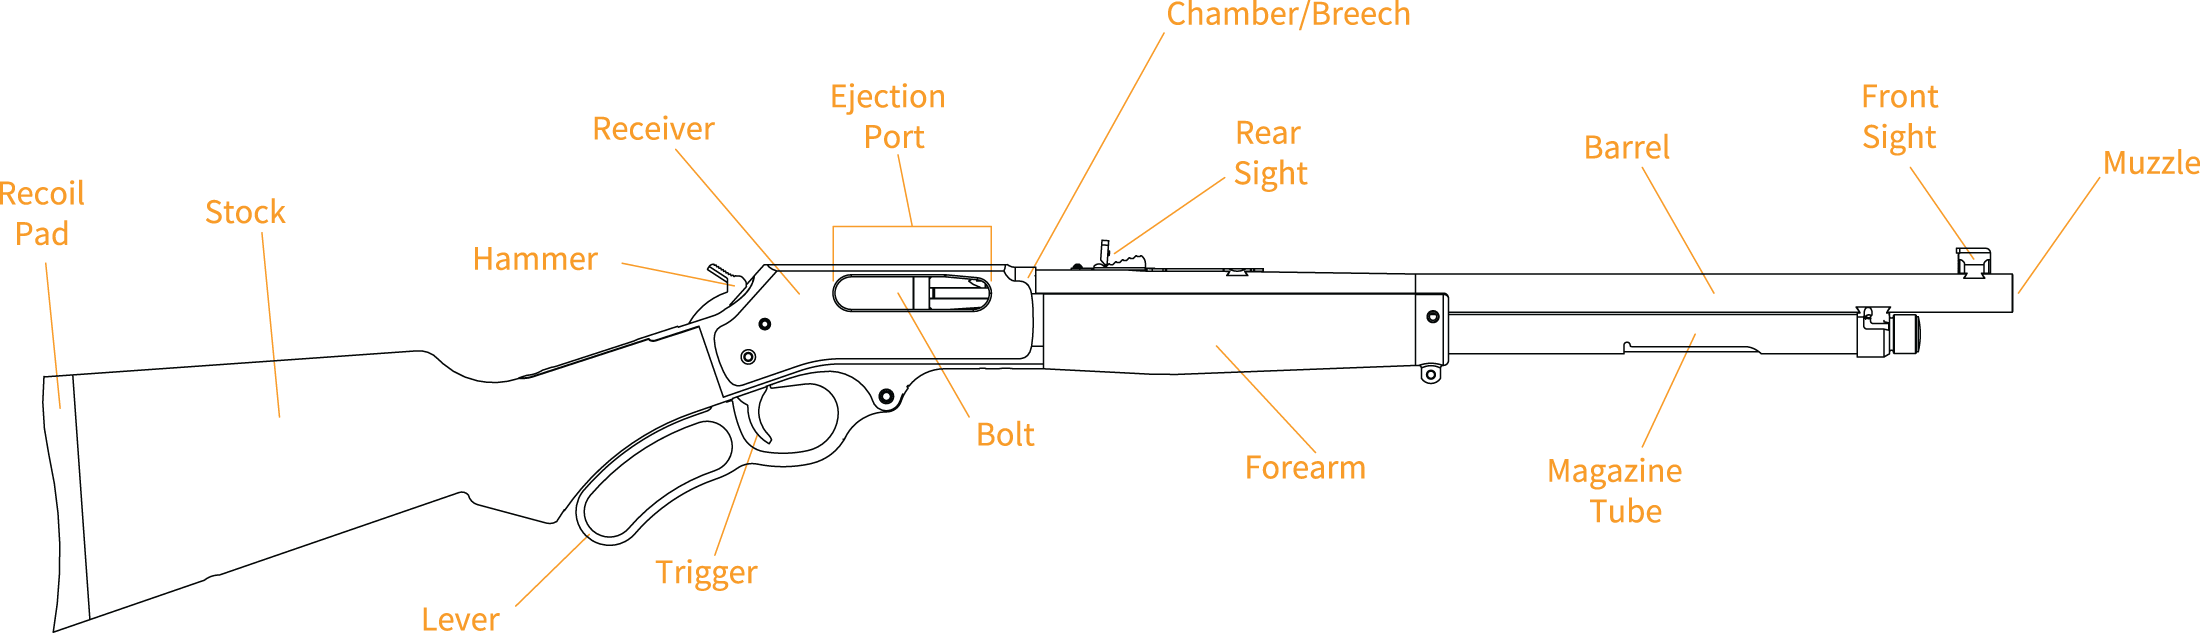
Terminology & Descriptions

Congratulations on your purchase of your Henry .410 Bore Lever Action.

Both shotgun models utilize a blued steel-framed lever action with five-shot tube-loading magazines (2.5″ shells only), pistol grip wrists, sling swivel studs and a thick non-slip ventilated black rubber recoil pad.

The H018-410 is the long version, with a 24″ round barrel, removable choke with invector style threads and a large front brass bead. No rear sight. This provides longer practical ranges with its barrel length and full choke, along with additional choke options you can purchase separately.

The H018-410R is a more versatile and compact shotgun, featuring a 20″ barrel with a cylinder bore choke, an adjustable semi-buckhorn rear and vertical blade-style front sight.

The H018AH-410 firearm features sleek construction with a barrel length of 15.14″, a large loop lever and an American Walnut forend and axe style grip with blued finish metalwork.

henry lever action .410 SHOTGUN 24″ (TOP), .410 SHOTGUN 20″ (middle)
and .410 side gate Axe Firearm (bottom)

.410 Shotgun 24"

H018-410 Side View

Action Type
Lever Action Shotgun
Caliber
Bore
Capacity
5 Rounds
Barrel Length
/type
24″ Round Blued Steel
Rate of Twist
Smooth Removable Invector Style Choke – Full
Overall Length
44.5″
Weight
7.5 lbs.
Receiver Finish
Blued Steel
Sights
No Rear Sight, Brass Bead Front
Scopeability
N/A
Stock
American Walnut Pistol Grip
Buttplate/pad
Black Ventilated Rubber Recoil Pad
Length of Pull
14″
Safety
Transfer Bar

.410 Shotgun 20"

H018-410R Side View

Action Type
Lever Action Shotgun
Caliber
Bore
Capacity
5 Rounds
Barrel Length
/type
20″ Round Blued Steel
Rate of Twist
Smooth/Cylinder Bore
Overall Length
40.5″
Weight
7.3 lbs.
Receiver Finish
Blued Steel
Sights
Fully Adjustable Semi-Buckhorn Rear & Vertical Blade-Style Front
Scopeability
Drilled and Tapped for a Weaver 63B Mount
Stock
American Walnut Pistol Grip
Buttplate/pad
Black Ventilated Rubber Recoil Pad
Length of Pull
14″
Safety
Transfer Bar

.410 Side Gate Axe Firearm

H018AH-410 Side View

Action Type
Side Gate Lever Action
Caliber
Bore
Capacity
5 Rounds
Barrel Length
/type
15.14″ Round Blued Steel
Rate of Twist
Smooth Removable Invector Style Choke – Full
Overall Length
26.4″
Weight
5.75 lbs.
Receiver Finish
Blued Steel
Sights
No Rear Sight, Brass Bead Front
Scopeability
Drilled and Tapped for a Weaver 63B Mount
Stock
American Walnut Pistol Grip
Buttplate/pad
None
Length of Pull
None
Safety
Transfer Bar

Ammunition

The Henry Lever Action Shotgun .410 Bore and Axe Firearm .410 Bore is chambered for use of 2 ½” shotgun shells only. Use of any other ammunition can cause excess pressure and possible serious injury.

The gauge of your .410 Bore is inscribed on the barrel near the receiver.

– Factory .410 bore shotgun shells only.
– Chambered for 2 1/2″ shells only.
– Never attempt to load 3″ shells.
– Barrel has a smooth bore with no rifling and removable choke with invector style threads.
– Slugs are not recommended with the factory full choke.

ALWAYS HAVE ADEQUATE VENTILATION IN THE AREA THAT YOU DISCHARGE A FIREARM. LEAD EXPOSURE CAN OCCUR FROM DISCHARGING FIREARMS IN POORLY VENTILATED AREAS, CLEANING FIREARMS OR HANDLING AMMUNITION.

Lead is a substance that has been known to cause birth defects, reproductive harm and other serious injury. Wash hands thoroughly after exposure.

Ammunition Selection

ALWAYS USE THE CORRECT AMMUNITION FOR YOUR PARTICULAR FIREARM.

Henry Repeating Arms Firearms are designed to function with a variety of brands and types of factory-manufactured ammunition in the appropriate caliber, but not all ammunition produces the same result. Be sure the only ammunition you carry correctly matches the gauge or caliber you are shooting. Never use non-standard, reloaded, or “hand-loaded” ammunition which has not been subjected to internal ballistic pressure testing.

Henry RAC recommends that after you read and understand this manual, you go to the range and fire different ammunition which is appropriate to the caliber of your firearm. Once you find the ammunition which functions best, keep using it.

Range and Shooting Cautions

ALWAYS DESIGNATE A KNOWLEDGEABLE AND RESPONSIBLE PERSON TO BE IN CHARGE TO MAINTAIN SAFETY CONTROL WHEN A GROUP IS FIRING ON A RANGE. Obey their commands so that discipline is maintained to reduce the possibility of accidents.

ALWAYS CARRY YOUR FIREARM EMPTY WITH THE ACTION OPEN WHILE ON A RANGE until preparing to fire and keep it pointing towards the backstop when loading, firing, and unloading to eliminate the risk of injury, death or damage to property.

ALWAYS KEEP THE HAMMER IN THE uncocked POSITION UNTIL YOU ARE READY TO FIRE. This will minimize the risk of an accidental discharge.

ALWAYS WEAR EYE AND EAR PROTECTION SPECIFIED FOR USE WITH FIREARMS. Flying particles could damage eyes and cause blindness.  Without ear protection, the noise of even one shot from your rifle and from other guns close to you could leave a “ringing” in the ears for some time after firing and the cumulative long term effect could be permanent hearing loss.  Make sure others in the vicinity of where you are shooting are doing so as well.

ALWAYS KEEP CLEAR AND KEEP OTHERS CLEAR OF THE EJECTION PORT. Spent shells are ejected with enough force to cause injury. The ejection port must also be unobstructed by your hand to insure safe ejection of spent rounds. Never place fingers in ejection port – they could be burned by hot metal or injured by the bolt moving forward.

NEVER PUT YOUR FINGER INSIDE THE TRIGGER GUARD UNTIL YOU ARE AIMING AT A TARGET AND READY TO SHOOT. This will prevent you from firing the firearm when it is pointing in an unsafe direction.

NEVER JOKE AROUND OR ENGAGE IN “HORSEPLAY” WHILE HANDLING YOUR FIREARM. Doing so could cause an accidental discharge.

Operating Instructions

Transfer Bar Safety

This firearm is designed with an ultra-safe patented Transfer Bar Safety Mechanism. This safety system prevents the gun from being fired under all circumstances, except when the hammer is fully cocked and the trigger is pulled. If the hammer is fully cocked and the trigger is pulled, the gun would fire as normal. However, if the hammer is fully cocked and is accidentally dislodged by some other means other than the trigger being pulled, the gun will not fire. If the hammer is in the process of being cocked and is accidentally released and dropped into the fired down position, before it is fully cocked, the gun will not fire. This shotgun can be safely carried fully loaded with the hammer in the fired down resting position. Please note that this shotgun does not have a half cock safety position nor a crossbolt safety. If you do not have a full understanding of how the safety system works, please call us immediately at 201-858-4400 and ask for technical assistance.

Maintenance Before Use

Before using your firearm for the first time, it should be cleaned. (See the cleaning instructions.) Your firearm was treated at the factory with either a preservative or oil to protect it against corrosion during shipping and storage. Preservative and oil should be wiped from the bore, chamber and exposed areas using a clean swab or patch before using the firearm.

Purchase cleaning supplies that are specifically designated for your type and caliber of firearm. Many suppliers offer these in kit form for your convenience. Follow the instructions provided with your cleaning supplies. Whenever your firearm has been exposed to sand, dust, extreme humidity, water or other adverse conditions, it should be cleaned and lubricated.

How to Load

To Load the Chamber (All Models)

The firearm can be single loaded. With an empty magazine, place one cartridge of the correct caliber through the ejection port with the rimmed end of the cartridge toward the action. Close the bolt by rotating the lever fully rearward, locking the cartridge in the chamber.

WARNING! The firearm is now loaded with a cartridge in the chamber.

To Load the Magazine (H018-410 & H018-410R ONLY)

This shotgun is a tubular feed design, using a brass inner magazine tube. Cartridges are loaded into the cutout in the outer magazine tube located underneath the barrel.

Important when loading, the action must be closed with the hammer in the un-cocked position (fired down position).

Rotate the inner magazine tube to disengage.

Pull the inner magazine tube out until the follower clears the loading port in the outer magazine tube. You can either remove the brass inner magazine tube completely or keep it positioned in the outer magazine tube just past the loading port.

With the muzzle pointed upward, insert the rimmed end of the cartridges into the loading port in the outer magazine tube and allow them to slide down towards the action.

Do not exceed the capacity of the magazine, which is 5 rounds.

Next, push the inner magazine tube back down into position, and lock it into place. The shotgun is now ready for operation.

Magazine Tube Plug Installation Option

Sold Seperately, does not apply to H018AH-410 Model

WARNING: A magazine plug which limits the magazine capacity to two (2) shells must be installed according to the Federal Migratory Bird Treaty Act and some state laws. Check with your local Fish & Game Commission to determine whether a magazine plug is required in your circumstances.


Magazine Tube Plug Installation
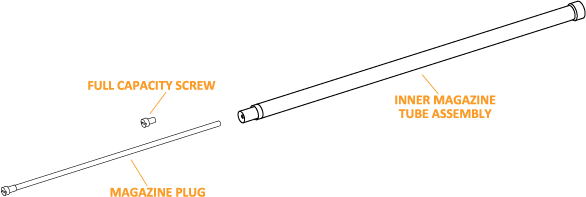
The Magazine Tube Plug is used to limit the number of shot shells to a quantity of 2 inside the magazine tube of your firearm.

To use the Magazine Tube, first check the chamber and the magazine to make sure there are no shells in the firearm. Unscrew and remove the full capacity screw, then place the Magazine Plug in the end of the Inner Magazine Tube. Replace and tighten the full capacity screw.

Do not use the inner magazine tube assembly without either the full cap screw or the magazine plug installed.

For full capacity loading, remove the magazine plug and re-install the full capacity screw.

This can be ordered at www.henrypride.com.

How to Load the Henry Axe Firearm (H018AH-410)

To load the Magazine

With the hammer down and the chamber empty, close the bolt by rotating the lever fully rearward. Insert a cartridge, bullet end first, by pushing the loading gate with the nose of the cartridge.

NOTE: Always check the firearm for the correct designation before loading the firearm.

To load the Magazine Tube

This firearm also uses a tubular feed brass inner magazine tube to hold cartridges. Open the action by rotating the lever down and forward until the bolt is fully rearward. Cartridges are loaded into the end of the blued outer magazine tube located underneath the barrel. Important – when loading, the action must be closed with the hammer in the uncocked position (fired down position). Pull the inner magazine tube completely out. With the muzzle pointed upward, insert the rimmed end of the cartridges into the end of the outer magazine tube and allow them to slide dwon toward the action. Do not exceed the capacity of the magazine. Next, push the inner magazine tube back down into position, and lock into place. The firearm is now ready­ for operation.

How to Operate

The firearm chamber can now be loaded by cycling the lever forward and pulling it back into a closed position. The hammer has been moved into the cocked position and the shotgun is now ready to fire.

If you are not yet ready to fire, then place your thumb on the hammer, and disengage the hammer by pulling the trigger slightly rearward. Immediately release the trigger while still holding the hammer, and bring the hammer into the fired down position. You now have the gun in loaded but safe to carry position.

If you want to fire the gun, bring the hammer back to the cocked position, aim in a safe direction at your target, and pull the trigger.

How to Unload

To unload the magazine and chamber, the hammer should be resting in the fired down position. With the shotgun pointing upward, withdraw the inner magazine tube. Tip the gun downward, allowing cartridges to slide out into a container. Before replacing the inner magazine tube, always check it to be certain that no cartridges are stuck in the magazine tube. Open the action again, by cycling the lever, to make certain that there are no cartridges in the chamber. Cycle the action multiple times to insure that no live rounds remain in the chamber.

Sights and Sight Adjustments

Your 4018-410R Model shotgun is equipped with a fully adjustable rear sight. The rear sight is adjustable for elevation (shooting high and low) and for windage (shooting left and right).

High or Low (Elevation Adjustment)

In order to shoot higher, you need to raise the rear sight. In order to shoot lower, you need to lower the rear sight. In order to raise or lower the rear sight, you need to grab the “ears” of the rear sight, and lift it up, in order to move the rear sight elevator, which sits below the ears. Your shotgun can be adjusted to shoot higher by moving the rear sight elevator backward by one or more notches. In order to shoot lower, the rear sight elevator should be moved forward. In addition, the rear sight contains a white diamond insert for fine-tuning height adjustment. This part is held in place by a screw. If you want to shoot higher, raise the insert. If you want to shoot lower, then lower the insert. There is a secondary adjustment in the white diamond insert of the rear sight. Loosen the screw to the right of the white diamond, raise or lower as needed to correct elevation, then re-tighten the screw.

Left or Right (Windage Adjustment)

To adjust your ­ for windage (left/right), we suggest that you move the rear sight to the left or right as desired. The rear sight sits in a dovetail slot cutout in the barrel. Current models will have a screw on the front of the rear sight assembly. This screw must first be loosened, prior to attempting adjustment. To adjust your shotgun for windage use a plastic mallet, or a hammer and a brass wedge to tap it in the direction you want your shots to print. For example: if you are shooting to the left, you need to tap the sight over to the right to correct the point of impact. Conversely, if you are shooting to the right then you will need to tap the rear sight over to the left.

Chokes (Does not Apply to the H018-410R Model)

Your Henry .410 Shotgun comes with a full pattern invector choke. Make sure to check choke tightness periodically to ensure that it has not become loose. Additional invector chokes can be purchased from your local gun shop.

Changing the Choke

Make sure to inspect chokes for damage before installation as a damaged choke may damage your shotgun and/or cause serious personal injury.

Before removing or installing and choke tube, open the action and verify that firearm is not loaded.

REMOVAL OF CHOKE TUBES

1. To change or remove the choke tubes, use the wrench that was supplied.

2. Align either stepped end of the tool with the notches in the choke tube as shown. Turn counter clockwise.

3. When the choke tube is loosened, remove it completely with your fingers. Place the choke tube on a clean, dry surface.

Choke Replacement 1

1. To change or remove the choke tubes, use the supplied tool.

Choke Replacement 2

2. Align stepped end of the tool with the notches in the choke tube as shown above. Turn counter-clockwise.

Choke Replacement 3

3. Start new choke tube into the muzzle with the threaded end entering the barrel first and the 4 notches pointing away from the barrel.

Choke Replacement 4

4. Turn clockwise, starting threads by hand, then use supplied tool to fully tighten.

INSTALLING A NEW CHOKE TUBE

1. Start the new choke tube into the muzzle with the threaded end entering the barrel first and the 4 notches pointing away from the barrel.

2. Turn clockwise, starting threads by hand.

3. Use supplied tool to tighten.

The end of the choke tube will be flush with the end of the barrel when properly installed. Do not use excessive force when installing. Choke tube tightness should be checked periodically to avoid damage to the choke, firearm, and to prevent injury to you or those around you.

NEVER FIRE YOUR SHOTGUN WITHOUT A CHOKE IN PLACE. FIRING WITHOUT A CHOKE CAN DAMAGE THE THREADS FOR THE CHOKE.

Inspect choke tubes periodically to insure they are properly installed and in good condition. Pay special attention to the threaded end of the choke tube to be certain it is not deformed or dented. Never fire this firearm without a choke tube properly installed. Failure to do so will damage the precision threads on the inside of the barrel. Firing this firearm with loose choke tubes may lead to damage to the choke tube and barrel, as well as serious personal injury to you or those around you.

Care and Cleaning

The precision threads on your choke tube should be kept clean and lightly oiled at all times. During cleaning of the barrel, be certain a choke tube is properly installed. This will avoid residue build-up on threads.

Spare Chokes are available on www.henrypride.com under “Parts”.

Malfunction and Troubleshooting

NEVER USE YOUR FIREARM IF IT FAILS TO FUNCTION PROPERLY, AND NEVER FORCE A JAMMED ACTION. Forcing the action could make the round explode, causing serious injury, possible death, or severe damage to your firearm or other property.

FAILURE TO FIRE. A misfire occurs when the firing pin strikes the primer and it does not fire. IF THE FIREARM FAILS TO FIRE DO NOT PUT IT DOWN OR OPEN THE ACTION. ALWAYS HOLD THE FIREARM, KEEPING IT POINTED IN A SAFE DIRECTION AND WAIT 30 SECONDS. IF A HANGFIRE (SLOW IGNITION) HAS OCCURRED, THE ROUND WILL FIRE WITHIN 30 SECONDS.

If the round does not fire, remove the ammunition, eject the round and examine the shell. If the firing pin indent on the primer is light or non-existent, have the firearm examined by a competent gunsmith before firing again. If the firing pin indent on the rim appears normal (in comparison with similar previously fired rounds) assume you have faulty ammunition. Segregate the misfired round from other live ammunition and empty cases, reload, and carry on firing.

FAILURE TO EXTRACT (FTE). This is when the firearm discharges the round and fails to extract the spent round from the chamber. This could happen because of a bad extractor or bad/damaged casings.

FAILURE TO FEED (FTF). This is simply when the firearm fails to feed another round into the chamber. Put the lever in the open position and clear the ejection port.

NOTE: The ejection port should face the ground; this will allow the round to easily fall out (gravity is your friend here). This will work for both left and right handed shooters.

Cleaning, Storage and Maintenance

Cleaning Safety Precautions

WARNING: BEFORE PERFORMING CLEANING PROCEDURES, MAKE SURE THE HAMMER IS IN THE FIRED-DOWN POSITION, WHICH ALLOWS YOUR SAFETY TO FUNCTION AS DESIGNED. OPEN THE ACTION AND MAKE CERTAIN YOUR FIREARM IS COMPLETELY UNLOADED. KEEP THE MUZZLE POINTED IN A SAFE DIRECTION. FAILURE TO FOLLOW THESE WARNINGS COULD RESULT IN SERIOUS INJURY OR DEATH.

KEEP ALL AMMUNITION AWAY FROM THE CLEANING AREA. NEVER TEST THE MECHANICAL FUNCTION OF YOUR RIFLE WITH LIVE AMMUNITION. FAILURE TO FOLLOW THESE WARNINGS COULD RESULT IN SERIOUS INJURY OR DEATH.

NOTICE! It is very important that the bore of your rifle be cleaned thoroughly and promptly after shooting. Do not leave discharged (empty) cases in the chambers for any length of time, as the chemical composition of many cartridges contain moisture which can “sweat” out of the shell and onto the chambers’ surfaces, and possibly cause corrosion and rust.

How to Clean

Regular cleaning is important in order for your gun to operate correctly and safely. Taking proper care of it will also maintain its value and extend its life. Your gun should be cleaned every time it is used.

In order to clean it, we suggest that you first open the action by cycling the lever forward. Using a brand name cleaning kit, run the cleaning rod down the bore from the breech towards the muzzle. Wipe the bolt clean of any debris with solvent and a patch or small rag. Spray the bolt with some gun oil.

If you prefer to take your firearm apart to clean it, then we suggest the following: Open the action by cycling the lever forward. Remove the lever screw and then remove the lever. Next, remove the bolt from the receiver.

Note: This will loosen the ejector inside the receiver, so be very careful not to misplace it. You can then remove the ejector from the slot on the left side of the receiver. Use a brand name cleaning kit and clean the bore from the breech end. Then clean the bolt and oil it before replacing. To reassemble, simply do the reverse, remembering not to over tighten the lever screw.

NOTICE! DO NOT ATTEMPT TO TAKE YOUR FIREARM APART FURTHER THAN EXPLAINED IN THIS MANUAL. Your firearm is a specialized, finely fitted mechanism. You may permanently damage it by attempting to disassemble the inner mechanisms. If further disassembly for service or cleaning is required, take your firearm to a qualified gunsmith.

ALWAYS CLEAN FROM THE NATURAL DIRECTION OF THE BULLET. When you fire your gun, the powder residue and dirt are in the barrel. The chamber and receiver are clean. If you run a brush or patch from the muzzle end you will push this dirt, residue, and moisture into the chamber and receiver. This is a major cause of stuck cases or problems. If you push or pull a brush back toward the chamber, you will notice the brush will throw the debris from the bore back into the chamber. You do not have to disassemble this rifle in order to clean it sufficiently and to keep it operating properly.

USE A CLEAN PATCH SURFACE EACH TIME YOU GO DOWN THE BARREL. When you are using your firearm you will get abrasive dirt in the muzzle. The patch with solvent will flush this dirt out in the shortest distance. If you use this patch surface again, the dirt will be deposited in the chamber and neck. The next bullet down the barrel picks up this dirt and erodes the throat. This is the exact equivalent of cleaning in the wrong direction.

NEVER GO BACK AND FORTH REVERSING THE BRUSH. This will bend the bristles on the brush. This is the equivalent of bending a wire back and forth until it breaks. You will always ruin a brush if you reverse it while in the bore.

USE ONLY A FEW DROPS OF SOLVENT/LUBRICANT OIL. Use only the amount of solvent that the patch will absorb. If you use too much, the solvent or oil will drip down into the trigger mechanism; this will cause a gummy trigger. If you use too much oil, it will drain back toward the stock and could cause premature failure of the wood.

CENTER THE TOP AND ROD. BE CAREFUL NOT TO LET EITHER RUB THE BORE. All firearms record their history. This is the reason most people look down the barrel of a firearm. An experienced eye can tell the method of cleaning, the number of shots, and the gun maintenance applied to the firearm. Many marks are caused by people who carelessly let the tip or rod rub the inside the barrel.

NEVER RUN A BRUSH IN THE BARREL FIRST. This will damage the firearm. The brush will pick up dirt, moisture or powder residue and deposit it into the chamber or receiver. Never dip a brush in solvent. The solvent at the brush core will collect dirt and drop it into the receiver and chamber. Remember – Rust is neglect. Make sure all exposed metal surfaces are coated with a film of oil. After being subjected to damp weather, thoroughly wipe the bore and metal surfaces. Then apply a new film of oil. If exposed to a soaking rain, snow or salt spray, a more thorough cleaning and oiling may be necessary.

Make certain to thoroughly clean your firearm when finished with firing. We suggest that you purchase a name brand, top quality cleaning kit.

Maintenance Before Storage

When storing your firearm, do not encase it in anything that will attract or hold moisture, for example, leather or heavy cloth. Also, do not store firearms with a plug inserted in the barrel because this can be a contributing factor to moisture accumulation.

If your firearm is to be stored for an extended period, the bore, chamber and internal surfaces should be oiled with a high-quality lubricating oil or preservative intended for firearms. The external parts; receiver, bolt and barrel should be coated with an anti-rust oil.

Before using your firearm again, be sure to clean it. Every time you clean your firearm, check it for signs of wear. If wear is noted, do not use the firearm, have it checked by a qualified gunsmith.

Make sure your firearm is in good mechanical condition before firing it. Periodically have your firearm checked for signs of erosion, cracking, or wear by the factory or a factory certified gunsmith.

Storage Safety and Precautions

NEVER LOCK A LOADED FIREARM AND NEVER LOAD A LOCKED FIREARM!

ALWAYS CHECK TO MAKE SURE YOUR FIREARM IS NOT LOADED BEFORE CLEANING, STORING, TRANSPORTING IT, LAYING IT DOWN, OR HANDING IT TO ANOTHER PERSON so that it cannot be fired when it is unsafe to do so.

ALWAYS KEEP AND STORE YOUR FIREARM AND AMMUNITION IN SEPARATE, LOCKED LOCATIONS, OUT OF REACH AND SIGHT OF CHILDREN AND UNTRAINED PERSONS. Safe and secure storage of your firearm and ammunition are your responsibility.

NEVER LEAVE THE KEY TO THE LOCK FOR YOUR FIREARM WITH THE STORED FIREARM!

NEVER ASSUME THAT A “HIDING” PLACE IS A SECURE STORAGE METHOD.  Others may be aware of your storage location or come upon it by chance. It is your personal responsibility to use common sense when storing your firearm and ammunition and to always make sure they are not accessible to children or other unauthorized persons.

NOTE: Do not store your firearm in an air-tight container, and do not seal or attempt to seal the barrel to exclude dust, as the internal steel surface is more likely to rust or corrode by doing this.

BEWARE OF BARREL OBSTRUCTIONS. Be sure the barrel is clear of obstructions before shooting. Mud, water, snow or other objects may inadvertently lodge in the barrel bore. A small obstruction can cause a dangerous increase in pressure and may damage your firearm and cause injury to yourself and others.

BEFORE CHECKING FOR A BARREL OBSTRUCTION, BE CERTAIN YOUR FIREARM IS COMPLETELY UNLOADED. After assuring yourself that the firearm is completely unloaded, open the action and look through the barrel to be sure it is clear of obstructions. If an obstruction is seen, no matter how small it may be, clean the bore with a cleaning cord or a patch as described in the CLEANING section of this owner’s manual.

BE SURE ALL ACCESSORIES, SUCH AS SLINGS, SCOPES AND OTHER ACCESSORIES ARE COMPATIBLE WITH YOUR PARTICULAR FIREARM AND THAT THE ACCESSORIES DO NOT INTERFERE WITH ITS SAFE OPERATION.

It is your responsibility to understand and follow all of the instructions in the safety manual that accompanied your firearm, as well as those which may be supplied with your ammunition and any accessory.

NEVER DISASSEMBLE YOUR FIREARM BEYOND THE FIELD STRIPPING PROCEDURE OUTLINED IN THIS MANUAL. Improper disassembly or reassembly of your firearm may be dangerous and can lead to serious injury or death.

NEVER MANIPULATE, ADJUST OR CHANGE ANY OF THE INTERNAL COMPONENTS OF YOUR FIREARM UNLESS SPECIFICALLY INSTRUCTED TO DO SO IN THIS MANUAL.  Improper manipulation of any other internal component may affect the safety and reliability of your firearm and may cause serious injury or death.

NEVER ALLOW ANY ALTERATION OR REPLACEMENT OF PARTS IN YOUR FIREARM UNLESS PERFORMED BY A QUALIFIED GUNSMITH USING AUTHORIZED PARTS. If you do otherwise, improper functioning of your firearm may occur and serious injury or death and damage to property may result.

Parts

An illustration and list of part names are included in this manual. Please note that not all parts are available for sale. Those parts which are available should be installed by a licensed gunsmith. When ordering parts, please give part name and part number.

Important: If you make unauthorized adjustments or use unauthorized parts, Henry Repeating Arms Company will not assume responsibility for the proper functioning of the shotgun.

This gun is manufactured to perform properly with the original parts as designed. It is your duty to make sure any parts you buy are installed correctly and that neither replacements nor originals are altered or changed. This is why we say take it to a licensed gunsmith station. Your gun is a complex tool with many parts that must relate correctly to other parts. Putting a gun together wrong or with modified parts can result in a damaged gun, danger, and injury or death to you and others through malfunction. Always let a qualified gunsmith work on your gun and check any work you think was not performed by a gunsmith.

List of Parts (H018-410 & H018-410R)
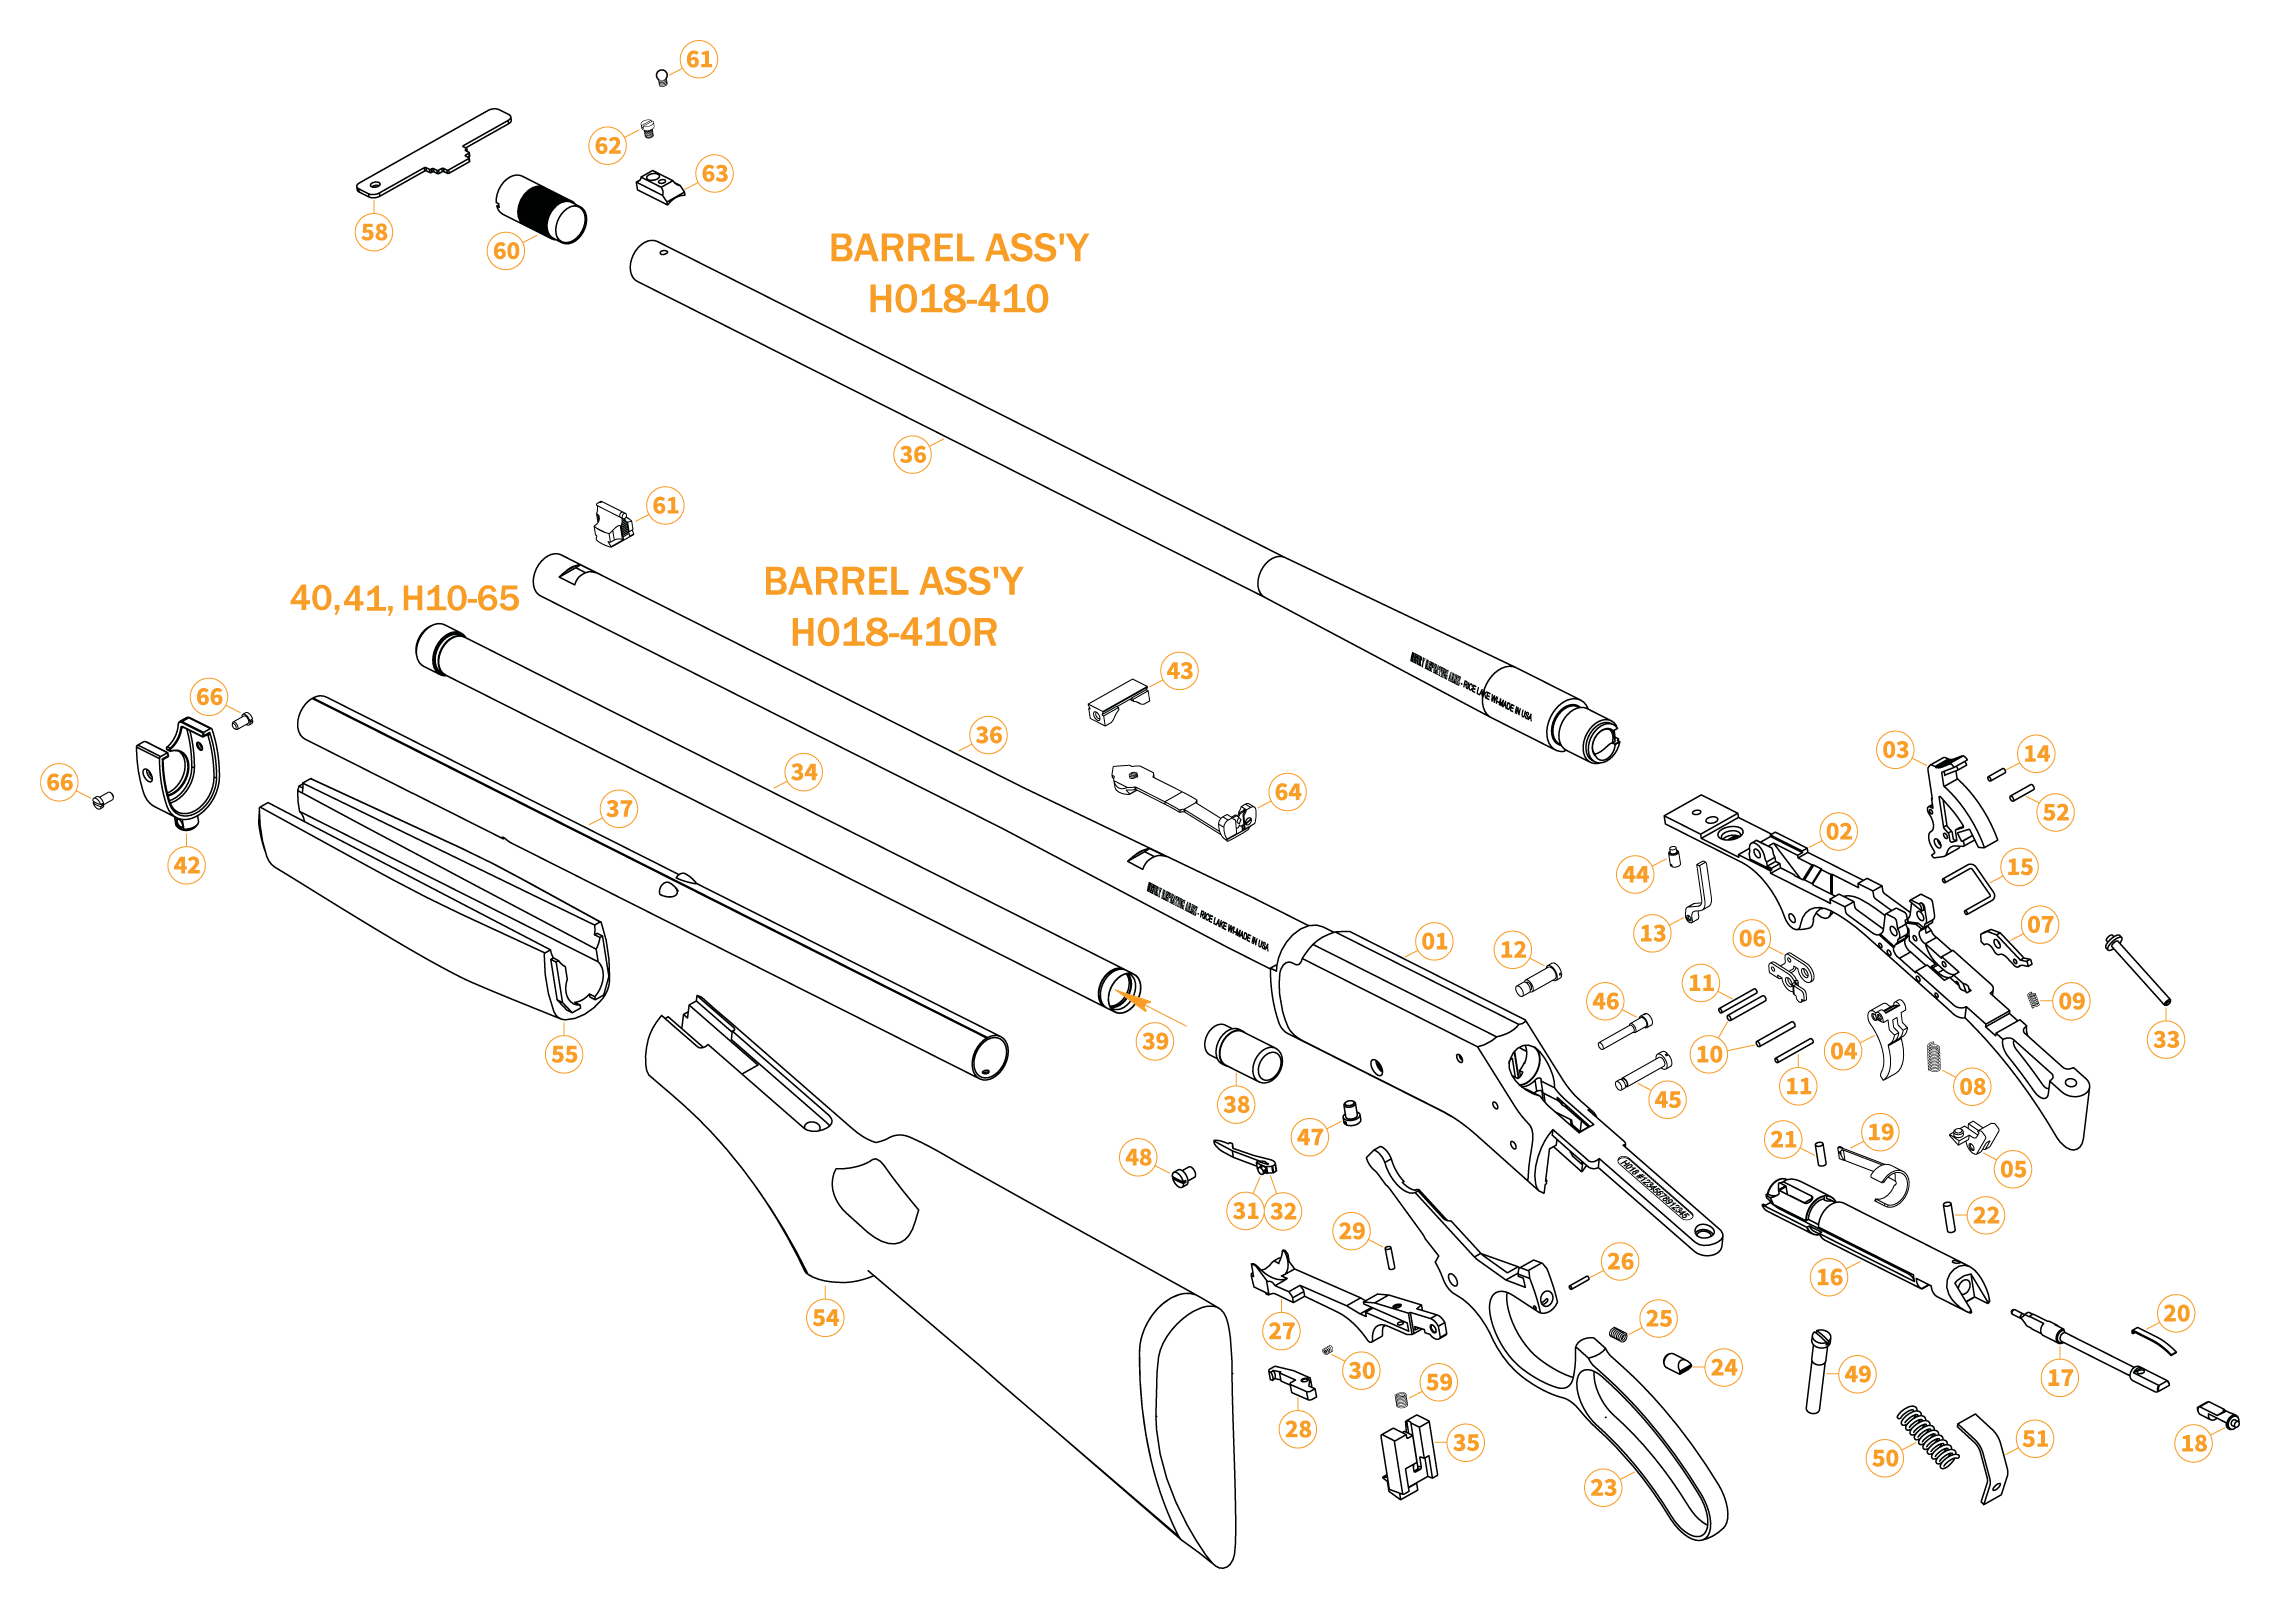
H018 Exploded Parts

01
Receiver

02
Trigger Guard Plate

03
Hammer

04
Trigger

05
Sear

06
Rocker

07
Trigger Lock

08
Sear Rocker Spring

09
Trigger Lock Spring

10
Sear Trigger Pin

11
Lever Detent Trigger Lock Pin

12
Lever Screw

13
Transfer Bar

14
Transfer Bar Pin

15
Trigger Rocker Link

16
Bolt

17
Front Firing Pin

18
Rear Firing Pin

19
Extractor

20
Firing Pin Spring

21
Firing Pin Return Pin – Front

22
Firing Pin Return Pin – Rear

23
Lever

24
Lever Plunger

25
Lever Plunger Spring

26
Lever Plunger Pin

27
Carrier

28
Carrier Dog

29
Carrier Dog Pin

30
Carrier Dog Spring

31
Ejector

32
Ejector Spring

33
Mainspring Guide

34
Inner Magazine Tube

35
Locking Bolt

36
Barrel

37
Outer Magazine Tube

38
Follower

39
Inner Magazine Tube Spring (Not Shown)

40
Inner Magazine Tube Knob

41
Inner Magazine Tube Knob Pin

42
Forearm Cap

43
Forearm Cap Support

44
Outer Magazine Tube Ret. Screw

45
Hammer Screw

46
Carrier Screw

47
Trigger Guard Plate Screw

48
Trigger Guard Plate Support Screw

49
Tang Screw

50
Mainspring

51
Mainspring Seat

52
Mainspring Yoke Pin

54
Buttstock & Buttplate

55
Forearm

58
Choke Tube Wrench

59
Locking Bolt Spring

60
Choke Tube

61
Front Sight

62
Front Sight Base Screw

63
Front Sight Base

64
Rear Sight

66
Forearm Cap Screw

H10-65
O-Ring

List of Parts (H018AH-410)

H018AH-410 Exploded Parts

01
Receiver

02
Trigger Guard Plate

03
Hammer

04
Trigger

05
Sear

06
Rocker

07
Trigger Lock

08
Sear Rocker Spring

09
Trigger Lock Spring

10
Sear Trigger Pin

11
Lever Detent Trigger Lock Pin

12
Lever Screw

13
Transfer Bar

14
Transfer Bar Pin

15
Trigger Rocker Link

16
Bolt

17
Front Firing Pin

18S
Rear Firing Pin

19
Extractor

20
Rear Firing Pin Spring

21
Pin, Front Firing Pin

22
Pin, Rear Firing Pin

23
Lever

24
Lever Plunger

25
Lever Plunger Spring

26
Lever Plunger Pin

27
Carrier

28
Carrier Dog

29
Carrier Pin

30
Loading Gate Screw

30B
Carrier Dog Spring

31
Ejector

32
Ejector Spring

33
Main Spring Yoke Assembly

34
Inner Magazine Tube

35
Locking Bolt

36
Barrel

37
Outer Magazine Tube

38
Follower

39
Inner Magazine Tube Spring

40
Knob Magazine Tube

41
Magazine Tube Knob

42
Forearm Cap

43
Forearm Support

44
Outer Magazine Tube Ret. Screw

45
Hammer Screw

46
Carrier Screw

47
Trigger Guard Plate Screw

48
Trigger Guard Plate Support Screw

49
Tang Screw

50
Main Spring

51
Main Spring Seat

54
Grip

54-1
Swivel Screw

55
Forearm

56
Loading Gate

56S
Outer Mag Tube Support

59
Locking Bolt Spring

59W
Choke Tube Wrench

60
Main Spring Yoke Pin

60C
Choke

63
Bead, Front Sight

64
Insert, Receiver

65-O
O-Ring

66
Forearm Screw

Servicing and Repair

If you believe that your Henry firearm requires repair or adjustment, we suggest that you first contact our Customer Service by visiting the “Contact Us” page on our website, or by phone at 201.858.4400. It may be a problem that we can resolve by phone or by sending a replacement part. For international customers please visit the “Contact Us” page on our website for instructions.
In the unlikely event that your firearm requires adjustments or repair, please make certain that it is unloaded and send it to us at the following address:

HRAC
Att: Repair Dept.
107 W. Coleman Street
Rice Lake, WI 54868

Enclose an explanation of the problem in as much detail as possible.
Make certain to include your complete name, address, phone number and serial number. Make sure your firearm is packaged to prevent it from being damaged. The package should be insured to protect against Loss or Theft.
Do not include “Henry Repeating Arms” in the address on the package, in order to prevent an inquisitive thief from being attracted to it by such information.

You can use the original box for return, however, you should make sure it is wrapped in a brown or other colored paper as to not indicate that the box contains a firearm. This helps to maintain the confidentiality of your rifle to ensure it gets back to us safely.

Download PDF Manual

Click to Download

H018 Shotgun Manual cover

Order a Catalog Order a Catalog
The Henry Guarantee

The Henry Guarantee

From Founder & CEO, Anthony Imperato

“When you choose to spend your hard-earned money on a Henry, you have my personal satisfaction guarantee and a lifetime warranty for the life of the product. Your 100% satisfaction is of utmost importance, and our award-winning customer service team is empowered to do whatever it takes to make sure you are happy with your Henry.”